blooming and editing

new flowers

For those of you keeping track, today I was going to start a weekly challenge. As the day grew closer I realized that it may be too much for me to do a freebie and a challenge at this point. I know it doesn't sound like much but, knowing myself oh so well, I just know that my mind will dwell and dwell until I find the perfect solution (for either one) and I need to narrow my focus. Less and better quality is my motto!

So... I've decided that I will only post Friday Freebies (yay!) and that will be part of the challenge—and you won't need a cutting machine if you'd like to participate (although that didn't stop Laura!). I'll explain that a bit further tomorrow and thank you to those of you that took the plunge with my first challenge! I love, LOVE seeing what you make—please keep it up and join us if you haven't!

cherry blossom

My flower obsession continues! This is a sneak peek at the new set of flowers that will be in the shop later today. I'm so distracted with end of school activities that I thought I'd have them up by now—they will be there later for sure.

I'm curious about something... do you prefer smaller easy projects when you're paper crafting or more complex ones that take many pieces and time to put together? The reason why I ask is that typically my projects are relatively simple but right now I'm working on one that is looking great but will take a while to put together. I'm going to post it regardless (because I'm having so much fun with it myself!) but I'd love to hear your thoughts. Anyone?


review - hand in hand: crafting with kids

I've already informed the kids that this will be a very crafty summer, so when I was offered the opportunity to review Hand in Hand: Crafting with Kids by Jenny Doh I was very interested. I wanted to see if there were any ideas that would contribute to the plan. I wasn't disappointed at all.

The projects in the book are simple for little hands and entertaining enough for older kids. I know my 9 yr old will enjoy it. I don't know about my 12yr old—but you never know.

What is completely unique about this book (in comparison to other kids crafting books that I can recall) is the fact that the projects are created by 20 extremely creative mothers (many well known in the online blogging world). Not only that, but they share their stories of creativity and how they relate to their children. I haven't read it all but so far much of what they share are either things I can relate to or be inspired by. Just this part of the book makes it an interesting read in itself.


The projects are simple but fun. Anyone can tackle them.


The instructions for all the projects couldn't be any clearer. 


This is definitely a great addition to our library and I can't wait to put it too good use in the slow summer days to come. 

(visit Jenny's blog for a full list of the contributing artists and other details)

lemons and such


I hope you forgive me if things are a bit slow on the tutorial/paper crafty side of things this week.

Our very dear next door neighbor passed away on Saturday and I just got back from her Memorial Service. She was 85 but full of wit, charm and gusto fit for a person half her age. Her passing was not a surprise but it doesn't diminish the sadness that we feel. We will miss her so much.

Fortunately we will have the flowers that you see above (photo taken in the early spring) that will always remind us of her. She's the one that gave us the bulbs that started our Amaryllis patch.

The symbolism/meaning of the Amaryllis is: pride, determination and radiant beauty.
So fitting because that describes her so well.

• • •

On top of that I was in a minor car accident on Sunday which left me with some back pain—still feeling it today. So there's that...

What is exciting?
- The kids will be out of school on Friday. We are SO ready for summer around here!
- My first nephew will be born at any minute now or at the latest will be here on Thursday. We can't wait to meet him!

So, like many things in life there are ups and then there are downs. Or in this case downs and then ups?

For now I have just drowned my sorrow in some crafty retail therapy—a sure sign that what I do is truly what brightens me up. How else could I explain that I'm happy that I have a new black ink pen (for Lori's LetterLab class!), some paper, Mod Podge and glue?!

Today is probably one of those days when I shouldn't be blogging. But oh well.

Have a beautiful afternoon!
XO

7 years

7 years

Today I celebrate seven years of blogging. Seven! It seems unreal.

Seven things I've learned:
- Go with the flow of my own creativity and personal pace.
- Stay true to my style. Always.
- Writing is still painful, but I make it work. Pressing "publish" still gives me pause.
- Take breaks when needed. It's better than posting for posting's sake.
- Accept that things are changing in the blogging world. Everyone is so quiet!
- It's great to have a 'specialty' but it's fun to try other things too.
- It's always best to keep learning. There's always room for improvement.

Thank you, thank you, thank you to those of you that have visited . I know there are a million places you could be and the fact that you stop by is still very important to me. I hope that I can continue to teach or inspire you in some way.

7 years

So... onto a few changes:

- Friday Freebie:  I will be posting freebies on Fridays—no strings attached. The files will be two-dimensional (SVG & DXF) and can be used for personal use only. Remember that you can use code seven12 for 30% discount on all A Little Hut products until tomorrow.


- Weekly challenge: I'm going to start a weekly challenge on every other Thursday. It will be based on an inspirational photograph or image. I will start the first challenge next week (May 31st).
- Product/tool reviews: I'll be writing more of these posts as I come across products I use and like.
- Product listings (as you see below): I've always thought these are practical when I've seen them on other blogs. You can see at a glance what product is being used at any given time. Full disclosure: I will earn some commission on these listings.

Just for fun!
Since birthday cards are something that we all need at some point or another I was wondering if anyone would like to show off their work with today's first freebie.

Who's willing to share? If you are, post your project to your blog or elsewhere on the web (ie Flickr) and copy the URL to upload by clicking on the little blue bar below the product listings. I'd love to see what you make!

That's all for now. See you Tuesday. Have a great weekend!


bit by bit

modspoons

For a long time my big dream has been to have a range of products that can be used on their own or as a collection. Slowly but surely I think my vision will be taking shape in the next few months—and it's about time.

This photo represents part of the plan: SVG cutting files, fabric and stamps for starters. I have a couple of additional things on the wish list but I'm still doing research and we'll see if they make the cut.

modspoons

My Modspoons fabric is back because I want to make some pillows for our bed and blue is my flavor of the month. I have to figure out how I can make the colors look more accurate in Spoonflower (they look so dingy!), my photo is definitely more accurate colorwise.

If you get a chance and you use SVG files come by tomorrow I will be making a fun announcement. As far as next week is concerned some fun product/book reviews are coming.

• • •
Friday Tidbits
- Something for the wish list.
- I love everything Lotta makes.
- Great and inspiring article. My favorite quote from it:

Why be the person complaining that it's not happening? 
We decided to just make it happen and 
we thought the worst thing that will come of it is failure.


I'm hoping our weekend will be as relaxing as the view from our lunch table was yesterday—a beautiful garden. 

Have a great weekend everyone! If you're in the US enjoy a safe and enjoyable Memorial Day weekend. See you tomorrow!


almost 7 years!

alittlehutwheelbarrow

On Saturday I'll be celebrating my 7th year blogging. Can you believe it?

You have no idea how many times I've thought that I need to move on and spread my wings in a different way. But here I am, still sticking around. I hope it's been worth it for you because it sure has for me.

Blogging has brought many, many good things—helped my creativity, brought me work opportunities, a book and great friends.

I've been thinking a lot about what I want this space to evolve into this upcoming year and although I won't be drawing a very harsh line in the sand you will be seeing some changes around here. I hope they will be something better for you and for me. We'll see!

To start the celebration there is a sale going on at the shop!


May 22 - May 27
Code: seven12 (apologies if you got the wrong code in an earlier email!!)

Be sure to add the code to the Shopping Cart page.

• • •

PS - I had SO much fun working on the wheelbarrow! There is always something a little extra fun about making something that is 'real' out of paper. Fun, fun!

diy weddings and parties

delicate lattice

Weddings and parties are the perfect occasions to show your style, color preferences and enjoy some crafty time (while saving money). Even if you don't have a machine yet, I'm pretty that the purchase of paper and a cutting machine would be cheaper than buying everything pre-made. There is of course the time involved in putting all the pieces together but wouldn't that just be a fun activity for a bridal or wedding shower? The more hands you get involved the easier it becomes.

delicate lattice

My Moroccan and Mission Style sets have already graced tables at wedding receptions and birthday parties as I've been told by a few of my crafty customers. Hopefully the new Sweet Honeycomb and Delicate Lattice sets will fare just as well.

sweet honeycomb

The versatility of my sets comes from the multi-purpose use of many of the pieces. The lanterns and tea light covers can be used for table top decorations or as gift favor holders, the borders can be added to place settings, place holders, menus, invitations, scrapbooking pages of the event and so much more. Add some flowers and you're set!

sweet honeycomb

Happy Monday!

happiness is...

testing stamps

Happiness is...

- Having a semi-productive week which I'm ok with because I needed to slow down.
- A happy birthday week (lots of love).
- A house full of laughter (a lot of giggling this week).
- Seeing the kids grow more confident every day (they're growing so fast!).
- Knowing that in about two weeks we will meet my first nephew (first time aunt! wooo!).
- Doing what I love (I could say this over and over every day).
- Playing with new stamp samples (more to come)!

Friday tidbits
- Craftsy Sewing Machine 101 - I totally need to look into this class (and it's free!) the rare times I take out my machine it always has some sort of issue and I know that lack of maintenance has to be a big reason why.
- Skinny laMinx - I hadn't visited Heather's shop in a long time and it was about time. She's doing amazing work as usual. I simply love, love her work. We have one of her table runners on our table now. Maybe it's time for a new one?
- Stillpower- The true Path to Flow, Clarity and Responsiveness: an interesting read. I love it when I'm in the zone. This week it was off and on for me but when I'm there it's amazing how easily creativity just flows.

Have a happy, creative and fun weekend!

boxes & bows - a different perspective

Today I have a little surprise for you! I'm very happy to introduce Lowri McNabb to you. She will be a monthly guest here and as an avid and talented paper crafter she will be helping me to show you a different take on my files and projects (check out her version of my Hanging Frame and Note Holder!). I'm very happy to have her here!

You can learn a little more about her here and on her PaperVine blog. Without further ado... here's Lowri!
• • •

Hi everyone – Lowri here to show you a few ideas using the Ribbon Handle Boxes and Assorted Bows Cutting files.

Ribbon Handle Boxes


I have used the lovely Everyday Moments Collection from Teresa Collins to create these boxes. The papers and almost all the decoration you see (with the exception of the ribbon) are from this Collection.


These little Parisian style boxes would be perfect gift holders for little bath salts or other small toiletry items.


Attaching a ribbon to the boxes is easy – but you can also leave the top plain or use a brad either on its own or through a piece of chipboard for extra dimension as shown below.


The detailing in these files is beautiful, and the boxes look just as lovely on the inside as on the outside when you use double sided scrapbook paper.


When you purchase these files – you will get detailed instructions, and if you are unsure of how to assemble these – check out Patricia’s great You Tube video here.


Assorted Bows


These ribbon bows files are simply gorgeous and I have done something a little different with these smaller bows. I have cut the bottom, larger layer from the Teresa Collins papers, but the top layer has been cut from an acetate sheet (these pieces were cut from a Kaisercraft “Four Corners” sheet).


This was easy to do on my Cameo, and though the cut-out pieces may need a little prizing from the sheet (use a fingernail to break through the sheet), if you do this carefully they will not tear. These bows would be fabulous for jazzing up some birthday gifts and I am definitely going to store this idea away for Christmas too!

I hope you have enjoyed these ideas –swing by my blog here for heaps of papercraft inspiration and tutorials. Please post a comment with any questions.

• • •


LOWRI McNABB

Hi – I’m Lowri McNabb and I live on a vineyard in beautiful Marlborough, New Zealand with my husband and 3 young children. I have dabbled in a number of crafts over the years, but nothing has ever captured my interest like papercrafting has. I started out creating an album after my first child was born and I have been hooked ever since.

I am thrilled to be teaming up with Patricia and A Little Hut. I love Patricia’s design aesthetic and I hope to bring a slightly new twist to her designs by showcasing them using the latest products from the scrapbooking world.

My blog is called PaperVine and it is packed full of papercrafting ideas and tutorials with the odd kids craft and cooking tip thrown in! Please swing by and introduce yourself – I look forward to meeting you!

tulip tie dye flowers and stationery

tie dye

When I was offered the opportunity to work on this 
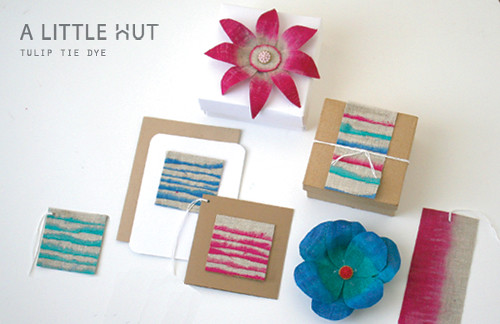
Tulip Tie Dye project I jumped at the chance simply because it's something I've never done before. In the end I ended up going in my own direction and although I did use fabric I decided to apply it to my tried and true love—paper goods. As you'll see I used the materials in a non-conventional way and because of this I have more than plenty of dye left over for more projects that I have in mind.

Materials
- Tulip Tie Dye
- Tulip Surface Cover
- Fabric stiffener
- Glue
- Small bowls (one for each dye color)
- Sandwich bags (optional)
- Scraps of linen
- Fabric scissors
- Paper trimmer or scissors, pencil and a ruler
- Paper towels
- Wooden clips
- Card stock and/or blank cards
- Decorative buttons (optional)
- Twine for gift tags or bookmarks (optional)

The Tulip Tie Dye kit comes with all the inks (even replacement packets of dye), plenty of rubber bands, gloves and very clear instructions. The bottles are perfect for the traditional tie dyeing projects that are described in the booklet (read it before starting and then save it!) but I went a different route and used bowls instead. The Surface Cover was very necessary to protect the area where I worked and the gloves are a definite must. 

FLOWERS
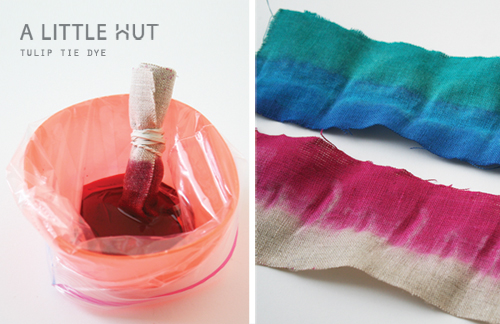
  • Cut two pieces of linen that are 3" x 10" (8cm x 25cm) each. Roll up the linen lengthwise and tie it with one of the rubber bands that are included on the kit. 
  • Dip the fabric in the ink of your choice. I used sandwich bags to wrap around small bowls but you can use disposable cups or plates or any type of container that has a narrow base. 
  • The roll needs to be removed when it is about half way to the point where you want the ink to rise. The ink continues to rise after the fabric is removed from the ink. 
tie dye
  • Set the fabric aside for about two hours so that the ink penetrates the fabric. 
  • Unroll the fabric and air dry it. I placed it on our lawn on a very sunny day and it dried rather quickly. I wouldn't recommend using your dryer because it would probably get stained since my tutorial doesn't include rinsing the fabric.
  • Once the fabric is dry, iron it and add fabric stiffener with a brush (follow the manufacturer's instructions). Let the fabric air dry again. 
Important! Please keep in mind that the steps to dye fabric that will be washed (like t-shirts, cushions, etc) is very different. This tutorial is only for fabric that will never be washed. 

tie dye
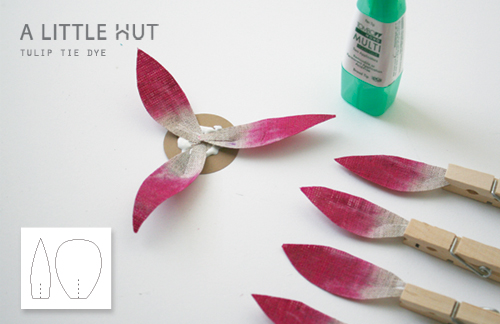
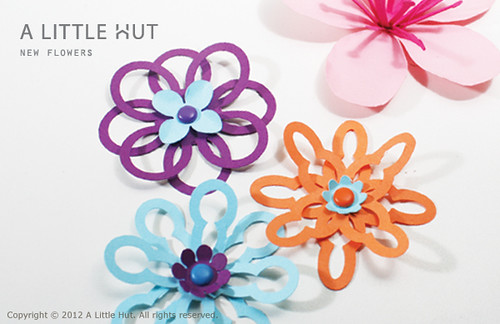
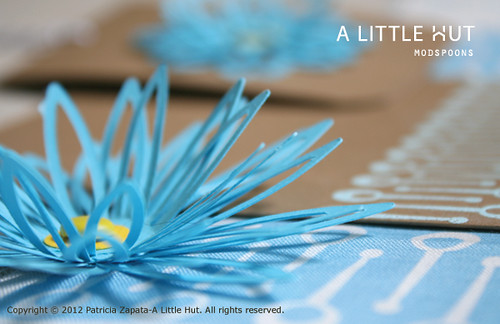
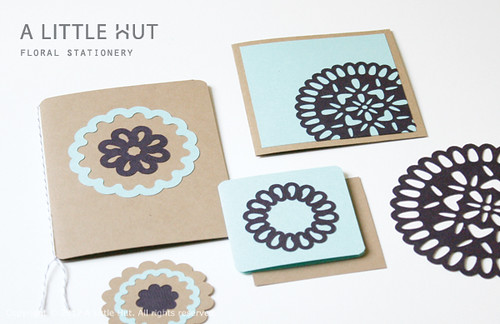
  • Using the fabric scissors cut out 8 petals that are approximately 1" x 4" (2.5cm x 10cm) in the shape that you prefer. The two shapes of petals are in the inset illustration above. The pink flower uses the petal design on the left and the blue one uses the shape on the right. 
  • Cut a slit in the center bottom of each petal that is about 1" (2.5cm) long. 
  • Overlap the two tips of each of the petals and glue them together. Use wooden clips to hold the petals together until they are completely dry.
  • Cut a circle out of card stock that is 1 3/2"(4.5cm) wide. 
  • Add glue to the center of the circle and attach the petals to the center of the circle. Make sure they overlap a bit so that the card stock isn't visible.
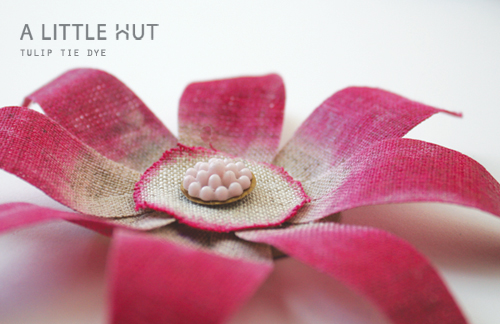
  • Cut out a linen circle that is 1 1/4" wide (3cm) and lightly ink the edges of the circle by rotating it as it is dipped in the ink.
  • Glue the circle to the center of the flower and attach a decorative button to embellish the project.
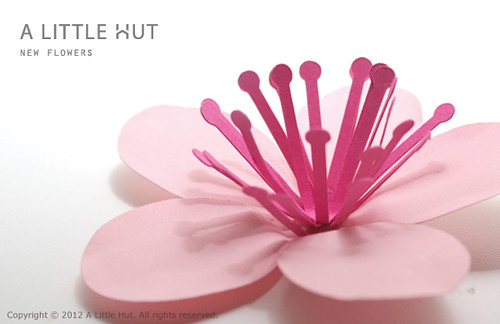
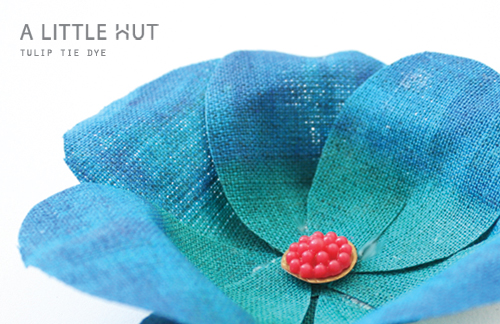
  • Curl the top of the petals downwards.
tie dye

The blue flower is made differently because the rolled fabric was dipped twice. I dipped it once in blue dye, let it set for about one hour and then I flipped it over and dipped the opposite end in green dye. Another difference is that this flower does not have the linen circle in the center. Note that the center of these flowers lends itself to many customized options.

tie dye

STATIONERY 
  • Cut strips of linen that are about 1/2" x 3" (13mm x 8cm).
  • Hold a piece of linen by folding it in half and dipping one of the long ends lightly in the dye. I folded the strips in half simply because of the small size of the bowls I used. Repeat this for each piece of linen. Place the strips of fabric on paper towels until they are completely dry.
Note on dipping: Practice first! The linen needs to touch the ink only for one second (literally!). The ink quickly rises even after the linen has been removed from the ink. After a couple of tries you'll get the hang of the amount of time and ink that is needed. 

tie dye
  • Using the paper trimmer (or a ruler, pencil and scissors) cut squares of card stock that are 3" (8cm) wide. 
  • Add strips of glue to the surface of the square and add linen strips one at a time.
  • Using the fabric scissors and the card stock as a guide, trim the excess fabric that overhangs the edges of the square. 
tie dye
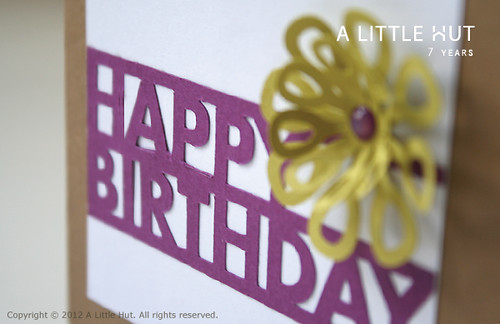
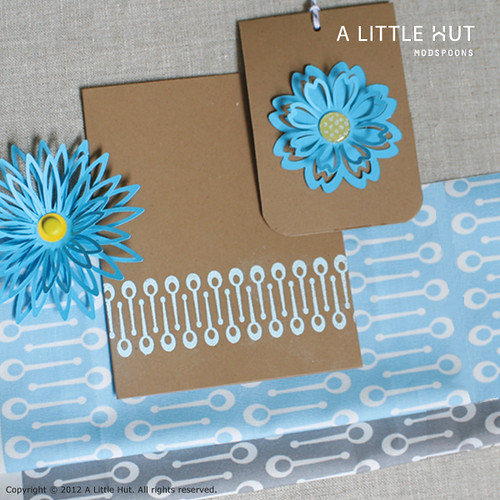
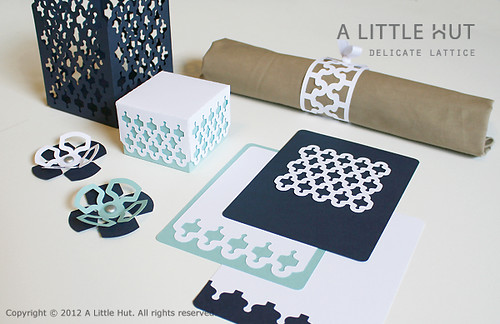
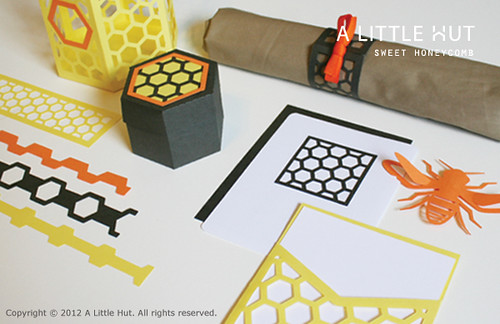
  • Glue the linen squares to blank cards that can be used as note cards or as gift tags. Larger linen pieces can be used for gift wrapping, book marks or for scrapbooking.
  • Most of the squares I made are monochromatic but combining the colorful strips (as seen on the gift box) is another clear way to go.
  • Remember that these are just ideas. Make them your own! Cover different shapes of card stock or cut more intricate shapes out of your fabric. The possible variations are truly endless!
Now I have to fulfill a promise. My daughter is begging me for a t-shirt. I promised her we'll work on it this coming weekend. We'll see how it turns out!

tie dye


Click on the image to the right to make it larger and read about fun techniques that you can follow for other tie dye projects.

Tulip Tie Dye Kits are available at Walmart, Walmart Canada, Michaels, JoAnn, A.C. Moore, Hobby Lobby, Hancock Fabrics, Meijer. Tie dye kit contents and colors may vary by store.

I wrote this post as part of a paid campaign with iLoveToCreate.com and Blueprint Social. The opinions in this post are my own.

Visit iLoveToCreate.com for many inspirational ideas and crafty projects:
Twitter
- Facebook
- Pinterest


simple (happy) monday

floral stationery

I hope everyone had an enjoyable Mother's Day! My Sunday started with breakfast in bed. Later on the family got together to celebrate the day and my birthday (tomorrow). And I got what I asked for—I'm going to go skydiving! I'm SO excited! I'll post all about it when I do it.

Today I'm just catching up on work and getting some goodies together to show you this week. I think you'll enjoy them.

For now here is a simple Floral Stationery set that is very versatile. Combine different colors and shapes according to the occasion/recipient and your cards and tags will never look the same. You can find it in the shop now!

Happy Monday!