halloween cards for kids

halloween cards for kids (freebie!)

Friday Tidbit
I typically share links to other people's work on FT. Today I decided to post a small freebie that you can share with friends that have festivities and birthdays this month (for personal use only - pretty please!).

I haven't made these cards in a while so the start of October gave me the perfect excuse to make them. I couldn't decide what color to use for the witch's feet so I left both cards. I like the idea of little hands learning how to write their own messages so that's why I also kept the lines.

Download the sheet here.

• • •

It's been a long week and I have so much to share. It just isn't the right time yet. I've been feeling really conflicted about how to balance the work that I'm doing with not disappearing from the internet altogether (at least for a while). It's a constant tug of war. I want to be around but a part of me just wants to unplug. I think that's why my posts have been only project driven—not much about me, about us. So excuse me as I muddle through. I think what I really need is to just get up and walk away as far as I can get from my computer, grab my cup of coffee and put my new bookmark to good use. Thank goodness for weekends!

Have a good one!

quick project - bookmark

Here I am talking about reading again. The thing is that I finally got fed up with not having a decent bookmark to use. I know a random business card or scrap of paper will suffice, but why not make something a bit nicer to look at? Here's my solution: personalized bookmarks.

bookmarks

Materials:
- 3 - 5"x 2" pieces of paper (two white and one colored piece of paper)
- Xacto, cutting mat and ruler (or digital cutting machine - I used the Cricut)
- Glue (I used spray mount)

I think the project is self-explanatory. Simply choose a letter and decide what side it should be on. I decided that the open side of the letters should go towards the inside of the bookmark (like the C & G) and the ones that have straight sides (P & D) look better on the opposite side. The idea is to just trim off a bit of the letter and still remain recognizable.

Print a letter in font of your choosing, keeping in mind that san serif letters are easier to cut (they have more straight edges). Cut the letter out of the printed page and trace it on one of the white pieces of paper (leaving part of the letter bleeding off to one side of the page). Cut the new letter out and use it as a template for the second piece of white paper. Trace the letter exactly the same size and in the same spot as the first. Now cut 1/16" outside of the lines in order to make the larger letter.

You should end up with three pieces of paper like this...


bookmark


• • •

Just to let you know... I'll be posting these small projects on Wednesdays to alternate with The Basics posts.

gift tags

This weekend we put the box, that little C and I made a few days back, to good use. It was the perfect way to give a friend his birthday gift, a gift card. I just added a matching tag and it was ready to go.

gift box

The gift card dilemma
I don't know about you, but it seems to me like it's getting harder to know what kids are into these days. So... gift cards have become part of our gift giving repertoire even though I have very mixed feelings about giving them. Half of me feels that they appear impersonal and like a last minute thing. But the other half knows that I'd rather give something that I know will be put to good use. The gift receiver will purchase what they really want and not have to deal with something we gave them and they may consider lame. I think (hope) that people know us well enough to know that the latter is really our intent when giving gift cards.

Book store gift cards are my favorites. As an avid reader, I'd like to think that a great book becomes a tiny part of our small friends' lives. If their moms catch them reading late at night instead of falling asleep when they should that would make me doubly happy. There's nothing better than being taken in by a great book.

gift tag or bookmark

While I'm on the gift giving thing...
I was organizing some files when I ran across this short video that I made exactly a year ago. I don't know why I didn't post it back then. It may have been because it's not particularly great (shot at an odd angle among other things) or because it's very similar to another one I made around the same time. But I decided to post it today. Why not? Maybe someone will find it useful. It will also make me cringe enough to improve my video making capabilities quickly. You have carte blanche to call me out on it if I don't. Deal?


Happy Monday!

inspiration

I had a me-time kind of morning. I headed out for some inspiration and a quick stop at Paper Source and I obviously didn't walk out empty handed. I got some paper in some very yummy colors for upcoming projects. It may not seem like it but I've been very busy behind the scenes. My blogging may suffer for the next couple of weeks—we'll see.

All I had was my iPhone with me so excuse the grainy photo and I'm sorry if seeing my book is getting old, but I still feel excited about seeing it out in the world.

I would like lots of paper from every color on that back wall please. I like what sign says too - "Do something creative every day."

my book in paper source

Friday Tidbits
In a couple of recent emails I've been asked where I find inspiration so I thought it would be good to share with the rest of you. These are my current favorites:

Houston museums - They are all fantastic. But one that holds a special place in my heart is The Menil Collection. I made many trips there for class assignments when I was in college.

Pinterest - I joined recently and I'm in heaven. I no longer need a folder on my computer to store all the photos that interest me. I can classify them into different boards, have access to them from any computer and I can share with other members too.

Dwell magazine - This is the only magazine I get in the mail (part of my 'live simpler' plan). The shapes in architecture, furniture and product design are always so thought provoking. The clean lines and styling are very appealing to me too. I get so excited when I see it in our mail box.

InsideOut - This is an Australian magazine I go on the hunt for. My local bookstore carries it at odd times but once I find it, it's SO worth it. I have every issue published since I discovered it last year and I've gone over every copy many times. There is always something new to look at. The InsideOut blog is also worth visiting.

Produce section in the grocery store - There really is nothing quite like Mother Nature's combination of color & textures. I'm using this particular inspiration source for some new projects.

Where do you get inspired? Anyone care to share?

Have a great weekend everyone!

SVG files for gift boxes

Yes, you've seen these before. But this is the first time they are not cut out by my own two little hands. I finally decided it was time to explore the world of digital machine cutting a bit more. I still love and will continue to work on handmade pieces, but this offers another option for those of you that are technically ready for something much less time consuming.

My Gift boxes, Halloween boxes, Baby boxes, Holidays boxes and Let's Go boxes are all now available as SVG files that are compatible with the Sure Cuts A Lot software. More box designs as well as other 3D designs are in the works.

new svg files

I've been asked many times if my boxes can be made any bigger and my answer has always been that the only way to do that with a PDF, is to photo copy it at a larger size. With the SVG files all you need to do is re-size and you're done.

I've always wanted to share these with the kids' classmates but cutting out so many boxes by hand seemed impractical (and who has the time?)—maybe this year I'll finally be able to do it!

For those of you that are still counting on the PDFs they will always be included in each set.

Important note: My designs continue to be sold for personal use only. NO reselling or sharing of files is permitted.

new svg files

the basics - making the mark

the basics - making the mark

When it comes to my work I'm a bit of a perfectionist so measuring is immensely important to do accurately. Cutting exactly where I want to cut is just as important. This is why even though today's TB tip is a very simple idea it's one that I use all the time.

When cutting out simple shapes that have straight edges I rarely use a pencil to mark measurements—unless it's a complicated shape. I use the tip of my Xacto to mark the paper where I need to cut. Once my marks are all made and I'm about to make the first cut, I like the feel of the tip of my Xacto sliding right into the first mark. At this point is where I slide my ruler up against the blade.

All set to cut!

the basics - making the mark

When I do need to use a pencil I use a mechanical pencil because the markings are crisper (hence more accurate measurements for cutting and/or folding).

Looking at the photo I used for today's post reminds me of the fact that I don't own a T-square. For some reason I never felt quite comfortable using one. Since we all know old habits die hard, my guess I will never own one. Do any of you use one regularly?

recycling project - wine tag

I was clearing out some projects and found this small one that I made a while back. It's a quick way to spruce up a gift of wine. I put this in the recycling column because I made this using remnants of other projects. I'm sure anyone that has crafty materials can put this together without getting anything new.

Sadly I give more wine away than enjoy it myself. Mr. Z is not a wine drinker and I just can't see myself opening a bottle just for me. Wine just tastes better while sharing it with others.

Materials
- piece of white card stock
- ruler
- pencil
- Xacto knife or scissors
- 1 3/4" hole punch (or use a compass and cut out a circle)
- bone folder
- 1 1/4" x 7 strip of patterned paper
- glue stick
- sewing machine
- narrow strip of linen

recycling project - wine tag

I measured and cut out a 2.5" x 7" piece of white card stock. I used the glue stick to attach the patterned paper over the long half of the rectangle. I punched a hole about 1/2" from the top border of the tag and scored a horizontal line at 2 1/2" from the top.

The last thing I did was sew the linen on the card stock with small stitches and pull some threads from both sides.

Done!

recycling project - wine tag

lazy weekend + good lesson

You know those weekends when not much gets done but it doesn't matter because that is just what was needed? That's how our weekend went—slow but perfect. It was however, not as enjoyable because our allergies were kicking in to high gear.

Sunday afternoon was all about football and paper crafting. While the boys watched the game, my little C and I unraveled a paper storm in the studio. I hadn't really used my Cricut Expression in a long time but I simply couldn't resist the paper dolls cartridge that was on sale at the craft store (more about that below). I knew that my mini-me would love it and I was right. She dove right in and was cutting left and right. We haven't had girly-crafty fun like that in a while—it was perfect.

She picked out all the colors, outfits and scenery, set up the pieces and asked me to take pictures of the final set up. She really doesn't have any idea of what scrapbooking is all about so she was playing with them in the more traditional paper doll kind of way and having them "walk" around.

paper dolls

By mid afternoon, half of the house was loud with the TV and the boys yelling at the players on the screen—and yelling at me to come over and watch some replay or another. The other half got really quiet. Little C had taken everything we had worked on to her room and I hadn't heard a peep for a while. I went in to check up on her and this is what I saw—and all I could make our were little whispers. I wish I knew what she was saying.

paper dolls

I'll end this with a confession.

I have a hard time working with machines like the Cricut because I feel like I should be able to come up with all these cut outs on my own. I've been wanting to make my little C some paper dolls for a very, very long time. But I just never got around to working on them. When I saw that cartridge I knew the time had come. I had to just give up and buy it.

It's been a painfully slow process, but I've come to realize that I don't need to be reinventing the wheel all the time. Sometimes it IS ok to give up on the desire to make everything myself, use what's available and just jump into the fun part of making something together.

In this case it was totally worth it!

making week

It's been a long but good week. I've been like a busy bee making all sorts of projects that I can't reveal just yet. They are the kind of projects that have me rubbing my hands together because I feel so good about them. I hate to be such a tease but it's been a really, really energizing time. I love it when I have a week like this one.

The only tiny personal project I had time for were these flat cards to replenish my stationery box. I use these a lot for small messages and to attach to gifts.

heat embossing

I've always been more of a fan of matte vs shiny but I'm really liking these simple heat embossing projects. I used tiny leftovers of Soft-kut printing blocks (feeling triumphant that I used part of my stash instead of getting anything new) and Martha Stewart bronze, silver and gold embossing powder for these cards.

heat embossing

Friday Tidbits
- Yuko Takada - The work of this paper artist is a must see. Prismatic is definitely my favorite.
- I read this post written by Lotta Helleberg over a week ago and I still think about it often. It just really struck a chord with me.

Have a great weekend everyone!

how to make a paper gift box

This is a very simple semi-origami tutorial on how to make a paper gift box. Many of you have probably made this box too. I don't even remember when my first one came about or who taught it to me.

I know the conventional/origami way to make this box does not include cutting any of the paper (and this tutorial does) so that's why I hesitate to call it a real origami project. I decided to go ahead and show this as an alternate option.

I made this project using the simplest of materials so that anyone can jump in and make it too. In this case, I used a letter-sized piece of paper that anyone has sitting in a printer.

Materials
- Square piece of paper
- Bone folder
- Colored pencils (optional)
- Scissors or Xacto knife (optional - if following the Craft video - link below)

[If you're reading this from a reader click on the How To... title below to see my video]


How to Make Paper Gift Boxes -- powered by eHow.com

Interestingly a couple of days after I shot the video above there was a tutorial of an origami box (with no cuts) posted on the Craft blog.

My little C has been sick and home with me the last couple of days. Today she was in the mood for something crafty so we worked on these boxes. She picked the contrasting colors for the larger box.

alittlehut-papergiftbox

Large box

It was made using 12" square (30cm) sheet of card stock. The difference in sturdiness when using a regular text weight sheet of paper vs. this card stock is significant. The thicker the paper the more necessary it is to use a bone folder.
Size: 4.25" x 4.25" x 2 (approx. 10 cm x 10 cm x 5 cm)

Small box
It was made using the top of a letter-sized sheet (as shown in the video) - 8.5" ( square sheet
Size: 3" x 3" x 1.5" (approx. 8cm x 8cm x 4cm)

Based on the above you can see that the box that you create will be 1/3 the size of the sheet of paper that you start with. The height is about half of the width.

The inside red box is smaller and fits in the blue one because I made the width of the square 1/4" smaller.

alittlehut-papergiftbox2

I like using thicker paper for this project because the markings, that are left behind by the folds, give a subtle texture to the surface of the box.

alittlehut-papergiftbox3

• • •

Just to let you know... Since this has been a fairly crazy week so far, I haven't had time to work on The Basics post yet. I will be postponing that until next week and getting the rest of my to-dos in order again.

Ahh... life. You just have to roll with it. Have a great day friends!

the basics - scoring with a bone folder

the basics

The bone folder is a great tool to give a project a clean look. It is used for scoring—which is the act of making a depression into paper so it can fold more easily. If paper isn't scored before creasing, it can crack and the fold will have a ragged edge.

Scoring
I like placing the bone folder on the point where I need to score first. Then I slide the ruler up against the bone folder. By doing this I allow for the thickness of the bone folder. I know this is minimal and almost negligible but in some instances (like making boxes) that can make the difference between a crooked or slanted box and a straight one.

the basics

the basics

Drag the bone folder against the ruler until you've reached the end point of the desired fold and you're done. Do not try to re-score any given line. It is virtually impossible to score in the same place twice and your paper will show two marks instead of one clean one. Just make sure to press hard enough the first time.

the basics

These are the two bone folders that I use. As you can see, by the aged look of the bottom one, I've had it the longest (since college). The only reason I got the second one (part of the Martha Stewart craft tools) was because the first got lost for a while. I like the curve that my newest bone folder has (offers a comfortable hold) but it isn't absolutely necessary. They both work just fine for me.

If you need to score a piece of paper but don't have a bone folder the dull side of a knife or pair of scissors will do the trick. If you use the latter, you have to be careful not to press too hard because the paper may tear.

printable + misc.

There's nothing like going to another city and getting away from everything. We left Friday afternoon and spent the weekend in Austin. The main reason for the trip was D had a soccer tournament, but because of this we also enjoyed hanging out with friends. I just wish I had taken more photos.

I'm so glad that we were smart enough to come back Sunday. That allowed for us to have yesterday off for a recovery period. Have you ever needed a vacation after coming back from a vacation?

Part of yesterday included getting a paper project done which I can't show you—for good reason. It's part of the finishing touches for my second book proposal. Eeek!

However, I can show you what I made for a new guest post. Visit Good Look Cookbook for the details.
moving announcement

review: design your own tees

If your interested in giving your t-shirts a DIY upgrade you should get this book. Design Your Own Tees by Jennifer Cooke includes 20 simple projects that involve simple sewing, hand-printing and screen-printing ideas. The instructions to the projects are easy enough for beginners to follow and the materials are easy to come by.

"T-shirts are classic: everyone wears them—and decorating your own tees gives you the opportunity to express your artistic vision or share your crafty enthusiasms. My goal is to inspire you to turn your tees into bold, graphic, personal statements, which is especially meaningful in this era of mass production."I think she achieved that goal where I'm concerned. I want to dive into one of these ideas and see what I come up with." - excerpt from the introduction.

design your own tees

The book is divided into three chapters: texture, pattern and color. It also shows techniques and ideas that include simple sewing, screen printing and block printing. One of the things that I really like about the book is that there are a lot of tips and variations included in each project.

design your own tees

I really like her pattern designs—organic and simple. They are included in the back of the book for those of you that prefer something specific to go by.

design your own tees

I'm thinking that this book is going to lead to an afternoon of t-shirt making in this house. I'll report results when we get to it.

To see more images of the book and Jennifer's portfolio visit her site at Raeburn Ink.

Happy Thursday!

(ps - the link above is an affiliate link)

the basics - cutting with an xacto or craft knife

the basics - xacto

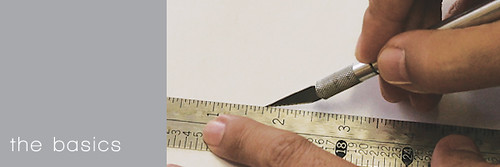
Today I thought it would be a good idea to dive into how I use my Xacto or craft knife. Since I'm trying to make these posts short and sweet, I think this tool will require future visits to offer more info—after all it is my best friend (after my MacBook)!

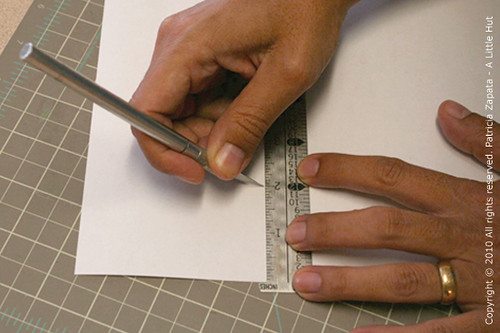
When cutting with an Xacto here are a few basic rules I follow:

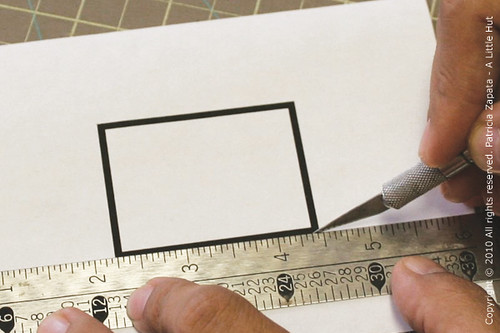
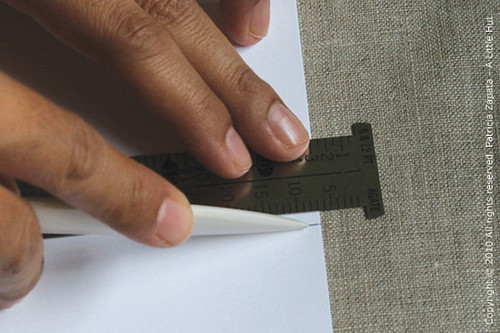
Always protect the work.
When I'm cutting and I need to use a ruler (always metal, never plastic) I place it over the piece I'm cutting out. If the blade slides off in a direction that I didn't intend for it to go it won't ruin the piece of paper I'm working on.

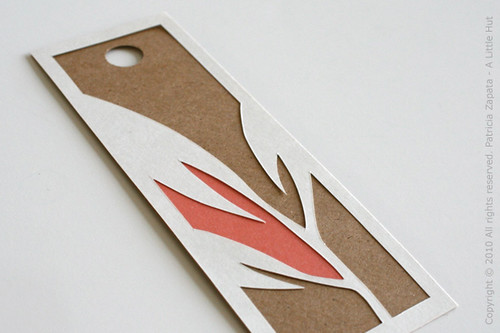
Never leave any borders showing on the final piece.
For the purpose of this example, I'm cutting out the rectangle and leaving the frame as my final piece. I used an extra thick border so that it would be more visible in the photos.

Place Xacto just outside of the outline and sink it into the paper.

the basics - xacto

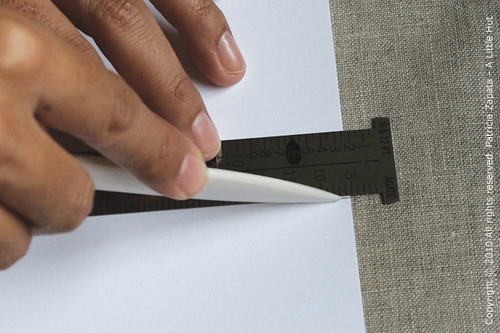
Slide the ruler against the blade and line it up with the rectangle. Remember my ruler is protecting the final piece or frame in this case.

the basics - xacto

Cut the long side of the rectangle.

the basics - xacto

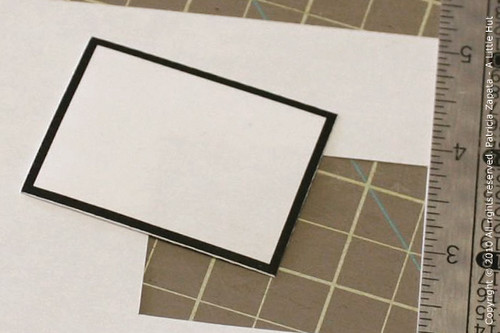
Do the same for the three remaining sides.

the basics - xacto

The shape is completely cut out and there are no black borders left on the frame.

If you look closely you can even see a very thin white line just outside the black border. If measurements aren't a concern, I do leave that white border to make sure I won't have any black marks on the final piece.

the basics - xacto

Typically the outlines I work with are hand drawn and made with pencil, but I still work the same way. Even though pencil markings can be erased and I draw lightly, they still leave the marks behind. I don't even want to recall how many times using an eraser has ruined a piece of paper. The safest bet is to eliminate markings of any kind during the cutting process.

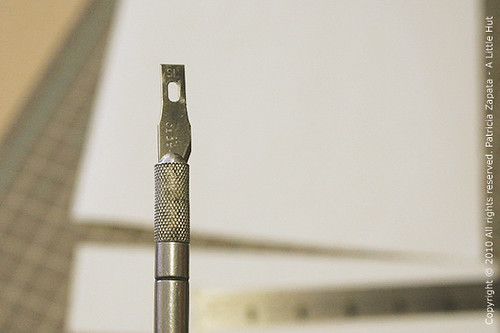
Does the blade really have to be that sharp?
My answer is no (no tomato throwing please!). I actually prefer a blade that has gone through some paper already. Even though cutting through something like it's butter feels great, I prefer to have a duller blade. I feel like it's more under my control. The trick is knowing when dull it too dull.

So, when is a blade too dull?
If I can cut a sliver of paper (and I mean less than 1/16" wide) off a scrap piece of the same paper I'll be using, then a blade is still good to go. If it catches the paper and wrinkles or tears it, I know it's time for a new blade.

Storage
Craft knives come with little covers that I always lose. My solution? I pull out the blade and store it with the pointy side towards the handle. I've done this for years—Easy!

the basics - xacto

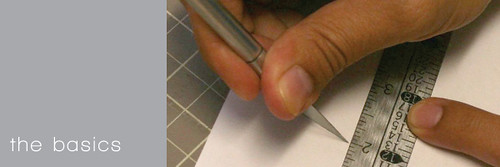
About The Basics (or disclaimer if you will)
Please note that this is how I do things. If you have better and easier ways to work, stick to them—and please feel free to share your thoughts in the comments section. Remember this is all, as the title indicates, intended for beginners and mostly taken from questions I get in emails. I hope it helps.