simple monday: quick and easy scraps card

simple monday - scraps

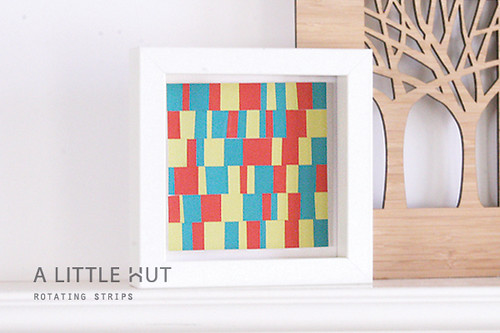
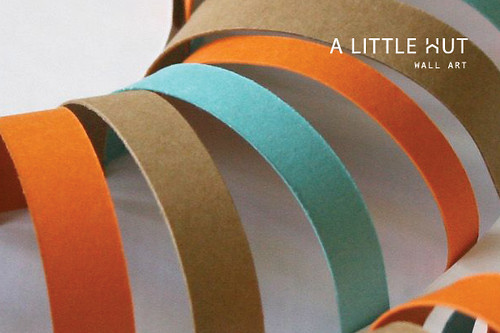
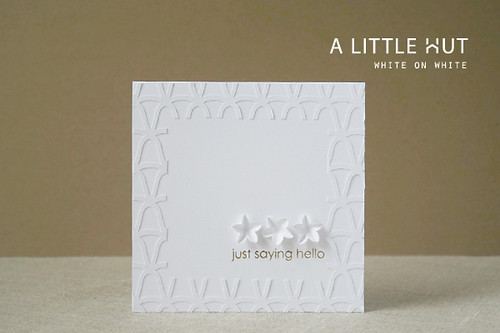
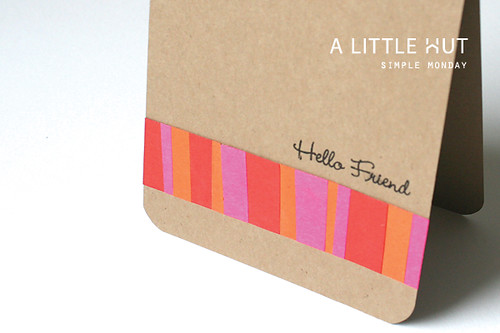
Here's a very simple card idea of how you can used the scraps project I posted a Saturday.
Simple is easy, quick and gives great results.

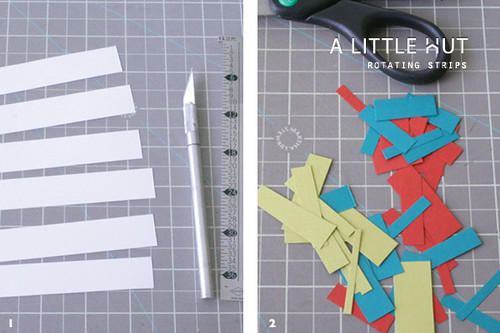
I simply used scraps, a Crop-A-Dile Corner Chomper tool, basic kraft card stock and a glue stick—that's it! This idea can be used for so many other simple projects—embellishing a gift tag, for a scrapbooking layout, and as a gift topper—I'll show you that tomorrow.

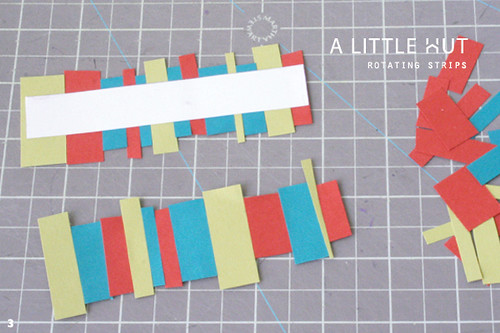
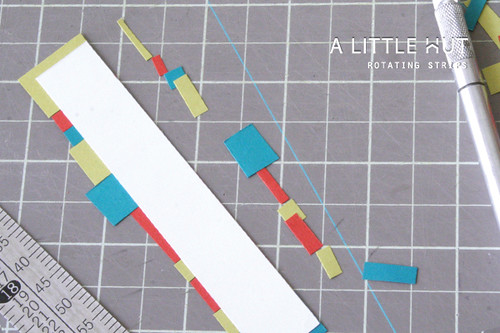
I forgot to mention that you don't even need to worry about making the strips completely straight or at 90-degree angle to the bottom of strip that I added the scraps to—a little slant gives the pattern some personality.

By the way, I know many people use tape gliders but for whatever reason those things have never worked for me. They unravel like old-fashioned cassette tapes and end up frustrating me more than anything else.

simple monday - scraps

The highlight of my weekend was helping my little C make her first scrapbook (I don't have a better photo because she wanted to take it to school to show it off- ha!). It was a simple project but I loved helping her. As a paper crafter I was thrilled, as a mom I was completely ecstatic! I love seeing her craftiness starting to bloom.

I love what I do but I never push it on the kids. I want them to take on their interests, whatever the may be, naturally. 

Her comment about the fact that her brother had no interest in joining us:
"D doesn't know what he's missing! This is SO MUCH FUN!" 
He-he. Love it!

We used:
- We R Memory Keepers Cinch Book Bindery tool (love it, love it! - very easy to use)
Sweet Treats Cricut cartridge (bought last year when her pleading face and eyes got the best of me —it helped that it was on sale too)
- A few of my SVG flower files
- The bird tag is from Skinny laMinx (gorgeous in person!)

Now to tackle the good ol' to-do list for the week. Happy Monday!


just scraps: rotating strips

rotating strips

As any paper crafter will tell you scraps are just something that goes along with the territory. So, what do we do with all those scraps? I'm going to periodically show you ideas that will help you use what you have and put all those little treasures to good use. Keep in mind that if you happen to have a magazine or other recyclable paper laying around they may work for these projects too.


Materials
- 2 - 5.5” squares of white card stock
- Paper trimmer or scissors (craft knife and metal ruler would work too)
- Three contrasting colors of scraps
- Glue
- Square frame (box frame is optional)

rotating strips

1. Cut a 5.5” square into 6 strips that are 5.5” wide and approximately 7/8” tall. The strips don’t need to have an exact height measurement.

2. Cut colored paper strips that are at least 1” tall and of varying widths (from 1/8” to ¼”).

3. Add a thin layer of glue to a strip of white card stock and randomly attach strips of paper. Repeat this process with all 6 strips of white card stock.

rotating strips

4. Place all strips with the color face down and cut the excess colored paper.

rotating strips

5. Glue all 6 strips to the second square of white card stock. Wait for the piece to dry completely before placing it in the frame.

Note: This project was made to fit into an Ikea Ribba 5 1/2" shadow box frame but it would look just as well in any flat frame.


So what do you think? Easy, right?
Have fun with your scraps!

thinking ahead

thinking ahead

- Spring cleaning is starting today. I can't wait to clear out so many things around here.
- Spring illustrations are coming along.
- Tutorials are forthcoming.
- And... I am now accepting advertisers. More about that below.

Friday Tidbits
- Dreamy! I want this to be my studio. You can all come over for drinks in the evenings!
- But my contemporary side would scream pick this one instead!
- Best article I read all week: The Truth: Creativity comes from blending dissonant goals into radical harmony 

• • •

Advertising
I want to partner with companies that are truly a good fit for A Little Hut. I want us all to benefit from this opportunity. I had been resistant to this idea for a very long time but now I believe it's the right thing for me to do for the blog to be sustainable. This will by no means affect anything I've been doing so far. In fact, I believe it will improve things. I will try to maintain the clean format that you've all grown accustomed to while making the ads visible to those of you that are interested in visiting my sponsors. I hope you understand this new direction and if you have any questions or if you are interested in advertising please contact me for more detailed information.

Have a great weekend my friends!


taking stock

peek

My grandmother used to say something like:
"If you're in a hurry dress up slowly."

I've been reminding myself of that all week long. Go slower. Just think.

I feel like I want to run, run, run with all the ideas that I've been having. I'm so inspired and yet I haven't created anything tangible—rare for me. What I have done is taken steps towards what I really want right now and what I want to accomplish in the next few months.

For starters, there is no longer a Book #2 in progress. Today, I finally came to the conclusion that my proposal wasn't strong enough. Tweaking it wasn't going to get it further along. So it's completely off my plate. I want to be dancing around in anticipation when my proposal is done and I wasn't. A better and stronger idea will come. Surprisingly I don't feel defeated at all. I feel relieved. There's nothing worse than a half-cooked idea.

Remember my survey? I thought that it would give me some answers and it has, but only partially. As you can see the top three are almost equal contenders and this has given me more to think about. I'll be deciding how I'm moving forward with this information in the next couple of weeks. Thank you so much to those of you that have participated so far. You still can if you'd like to help me out.

Results
23.3%    Paper crafts (general for beginners)
25.6%    Paper crafts (specific - ie. parties, holidays, decorating)
23.3%    Paper crafts (digital machine cutting)
16.3%    Recycling crafts (paper only)
4.7%      Recycling crafts (assorted materials)
0.0%      Crafts for kids
7.0%      Block printing

There are other decisions that I'm making in regards to this blog as well. No, it's not going anywhere! I just think it's time to take it to the next level. You'll see...

My sketchbook has taken a good beating this week. I have had so many ideas coming and going that if I didn't write them down I'd either a) completely forget them (very likely!) or b) my head would feel like it's going to explode.

So, yep, my brain is pretty much mush this week. Thinking a lot. It's all good... except I wish there were ten of me. Now the trick is to just start somewhere.

Here I go.
Slowly.

PS - My "Inspired By" posts will resume next week.
The photo is a peek at a project that was part of Book 2. Looking at it makes me wonder why I haven't worked with pop-ups. Now that would be fun book to work on!

how to make a paper pendant

paper pendant

I made this specifically to wear to the paper craft class that I taught at ALT Summit. It was entirely a last minute thing. If I'm completely honest I think it was a procrastinating-on-other-last-minute-things kind of project. In any case, I love it and got many compliments on it. So, here are the instructions so you can make one for yourself.

Materials
- White cardstock paper (I used basic craft store scrapbooking paper - 65lb)
- Cutting machine or craft knife and cutting mat
- Silver finding
- Pliers

paper pendant - cutting


If you have a cutting machine
1. Import  the SVG or DXF file to your cutting software. Use a 12" square piece of cardstock to cut out 12 pendants. Each one should be 2.75" wide.

2. Add glue to each layer and stack them neatly one on top of another. I cannot emphasize enough how important is that the shapes line up. If they don't the pendant will look messy and will, quite frankly, look cheap. Neatness counts big time here!

I like squeezing the glue bottle on a scrap piece of paper first—until the glue flows smoothly. That avoids the having a big blob of glue on a thin strip of your pendant. The rest of the gluing can be done using two methods—you pick your favorite.


- Add strips of glue on to each section of the pendant or...


paper pendant - gluing

- Add glue by using dots.

paper pendant - gluing

In either case, just make sure that you're not using too much glue. When the pieces are pressed to one another some glue may squeeze out from the sides—just clean it up as you go. If you keep the glue to a minimum this issue will be reduced significantly. Rub the piece that is added to the stack (to spread the glue a bit) and then line it up in the final position.

3. Once all the pieces are glued and dry you can add the finding. Use pliers to open it enough so that the pendant can slide in. Once the pendant is in place close the finding again. This can get tricky. Even though all the layers of paper will feel quite sturdy you still need to be careful to avoid tears.

4. Slide your new pendant onto a necklace and enjoy!


If you're cutting by hand
1. Print and cut out one of the pendant shapes.

2. Cut out 11 pieces of cardstock that are 2 1/4" x 3" and glue them all together. Add the glue in zig-zag fashion across and up-and-down each piece of paper until you have a neatly glued stack. Rub each sheet a bit against the stack before placing it in its final location—this allows the glue to spread evenly.

3. Glue the cut out pendant shape to the top of the stack.

paper pendant - cutting by hand

4. Start cutting out the pendant with a really sharp craft knife and using the pendant cut out as a template. I thought I was going to use a ruler but it wasn't necessary. Using the first cut out as a template was enough.

paper pendant - cutting by hand

Important! - Cutting the pendant will take some patience. Go slowly. It took me at least 7 strokes in each segment to get all the way through the stack of paper. The first couple of strokes should be done lightly (so that there are no mistakes with the others). The initials cuts will make a groove that will guide your blade the rest of the way down.

I cut the outer perimeter first and then the triangles inside the pendant but it doesn't necessarily need to be done that way. If you go slowly you'll be fine.

5. Follow steps 3 and 4 in the cutting machine section and you're done. Enjoy!

Downloads:
- The SVG, DXF and PDF files can be downloaded here.

 • • •

ALT Design Summit - Paper craft class — an awesome group!
(see me wearing the pendant?)
Photo by: Brooke Dennis

Alt Design Summit 2012 - Saturday

headed to alt summit!

diy cards

I'm headed to Altitude Summit (check out the great list of speakers)! I'm still running around like a mad woman getting ready.

Something obviously had to fall through the cracks and unfortunately it was my business cards. I had to get them printed at one of those quickie places using not such great paper and I DIY-ed the top half with my Cameo among others. The happy accident was that the machine couldn't cut through the thick stock—so I left the scored outlines. It'll do.

Now that that problem is semi-solved I still have some packing to do. Most everyone will be traveling tomorrow but I will miss half of the first day while I fly there. Oh well—this where the balancing act of mother/wife and self-employed designer come to play. I'm just rolling with it.

I'm excited. Nervous. Excited. Mostly nervous about my class but excited to meet so many people that I've known online for so long. I will finally meet them as well as so many other people too.

If you're in my class, get ready for some cutting fun! If you're not, don't hesitate to come up and say hello.

For those of you that won't be there—I'll be posting photos and comments on Twitter (I've added my stream to the blog too).

Catch you all next Monday!

Random blog stuff-- Love it! I can now answer your questions directly. Blogger has added threading to the comments section. Wonderful! 

• • •

Consider this my ahead of schedule Friday Tidbit...

Please see the video below (via Indie Fixx) to learn more about SOPA and why we need to stop it! Copyblogger also has a great article explaining the whole issue and why it should matter to ALL of us.

See you soon!


PROTECT IP / SOPA Breaks The Internet from Fight for the Future on Vimeo.

when you put your mind to it

ripples stationery

Fridays are going to be my Project Life days. I'm already into the second wee and I love it. The fact that I'm actually sticking to my guns is no small feat. I've been journaling on the grid cards and today I will develop the photos for the week (so I have nothing exciting to show right now). I'll be done as quickly as it takes to slip everything into the pocket sleeves. I like that—I need that.

It's been crazy around here. Between work and D's first experience with mid-term exams (oh he hated every minute of it!) I think we're all overdue a laid back weekend.

The biggest thing on my mind right now is getting ready for Altitude Summit I can't believe I'll be there next Thursday! Yikes! It has come so quickly. My class materials are almost done (I wish that were the case with my what I'll be wearing!) and I can't wait to see who my students will be. Not to mention the fact that there are so many people that I want to meet. It's going to be really exciting. I'll take lots of photos so be ready for those.

ripples lattice

One of the fruits of this week's labor is my new set of Ripples Stationery and the matching Ripples lattice and border. I think adding some green is just my subconscious wanting to call spring here faster. I can certainly do without the cold mornings!

The lattice is a welcome addition to this collection. Love it! I used the Ripples card of the set to make one the cards for my Clean & Simple class assignment too. I need to be killing several birds with one stone or I'll never get anything done!

Friday Tidbit
I don't have a link per se but just a thought...
Stop postponing your personal projects (whether they are crafty or not).What is holding you back? Before you answer that, believe me when I say that I was the queen of excuses when it came to not working on something like Project Life—but this year I'm taking a different approach. I'm just going for it! How about you?

Thank you SO much to those of you that have responded to my little survey regarding a paper class I'm planning. I love reading all your comments and ideas! I'll post some general results next week. If you haven't answered and have a couple of minutes it's right here (only 3 questions!) and thanks again!

Have a great weekend everyone!


it is a good thing

ripples

Sometimes I put so much on my plate that before I know it... boom! I crash. I'm getting close to that point right about now. At the same time I'm having one of those days where I think I'm so lucky to be doing what I do. Gratitude is a good thing—yes it is!

• • •

"Feeling gratitude and not expressing it is like wrapping a present and not giving it."
—William Arthur Ward
• • •

The photo is a little preview of what I've been working on and so is the card that I made for OCC day 3 (layering).

friends forever

occ - day 2 (flat card)

Sometimes it's so nice to dig up treasures from your stock pile. That's what I did when I used this stamp, that I carved ages ago, for today's Online Card Classes flat card assignment (you can still sign up if you're interested). I hadn't worked on making a print in so long. I must do it more often.

Block printing and I will definitely be friends forever.

Materials:
- French Paper
- Linoblock
- Block printing ink

 What crafty tool have you abandoned and would like to pick up again? I'm sure there's something...

• • •
By the way...
- My holiday items are still on sale (until the 16th!)
- Lettering Delights is have a huge dollar days sale that I keep forgetting to mention. Some of my flowers are on sale there too!

just saying hello

onlinecardclasses1

It's raining. More like pouring! And I love it. There's nothing better than having a lot of work to do in weather like this. I focus more and I get more done. Soup is simmering on the stove and I worked on this card and a myriad of other things.

The card is based on a sketch given in the first assignment of the Clean & Simple class I started today. I used a lattice that I designed this weekend (coming to the shop soon), an All Occasion Messages stamp set from Hero Arts and an old EK Success flower punch (similar to this, but smaller). I'm thinking the flowers are overpowering the sentiment a bit—ah well.

Although I have a lot of work on my plate, it's so nice to have a side project (another one!) going on at the same time. I don't usually make cards so this is my way to exercise those muscles a bit.

So, far a good Monday!

projects

project life

So, here's a glimpse of the first week of Project Life. Super simple and straightforward. You know I'm not keen on showing family photos here so I'll only be posting glimpses or materials I've used.

My plan moving forward is to make some patterned journaling cards. Some may be printable and some will be cutouts. The flower image above is a heart 'flower' that I decided not to include the in the new Valentine's Day Kit—it's seems to be working well here.

For now I've decided that the color will be given by photos. My journaling and additional elements will be neutral with the occasional pop of color that goes with the photos on the pages—at least that's the plan.

As far as the photos are concerned—I'm going the pharmacy prints route. I don't have a particularly good printer (I rarely use it anyway) so I don't want to spend time on special paper, ink, etc. While I worked on my journaling I sent my photos to the store online and picked them up an hour later. Easy.

For this spread I used kraft paper, grid journaling cards and photo pocket pages (design A).

• • •
Another project in the works
I'm putting together ideas and sketches for an e-course that will be ready in a few months. It's going to be a big project but I'm so ready for it. Since it will be for you I'd love to hear what your thoughts are on the subject matter and materials. What type of e-course would you like from me?

I've set up a very short survey (3 questions) where you can speak your mind and only I will see it. If you'd like to post in the comments section below that would be perfectly fine to.

So how about it? What would you like to learn?

Please click here for the survey.

• • •
Friday Tidbit
Craftcation Conference: You know when you go from site to site and you don't how you landed at a certain page? That is what happened to me this week with this web site.


Delilah Snell and Nicole Stevenson are co-producers of this beachfront 3-day conference that will take place March 22-25, 2012 in Ventura California. The line up of speakers is pretty amazing. I wish I could be a fly on the wall there!

Dieline's Top 100 package design of 2011 - An amazing list full of eye candy! 

• • •

Have a great weekend everyone! 
[ahhh! sorry for the dual or even triple posting today!]


project life: day one

valentine's day kit

"You're little boy is all grown up."

He said that and it hit me (he's going to be twelve in 7 days). He's right—and other than photos I don't have much else to remember this amazing adventure with him or his sister. What about all the stories and conversations that go along with those photos? (enter mom guilt—gulp) So, I'm going to remedy this situation this year.

I've been eyeing Project Life for a long time. For those of you that don't know what it is: in a nutshell it's scrapbooking in a minimalist way—or at least that's the way I see it. It's more about the stories and the photos, then it is about layouts and embellishments. As with any creative project, styles vary wildly. There is no surprise in the fact that I prefer the minimalist side of things and that's why I lean towards work by Ali and Liz.

I have journaling cards that I bought a long time ago and some photo pocket pages that I'll be putting to good use. Now that I think of it I may have mentioned this a while back. That effort obviously didn't take off. But now it will. I'm looking forward to designing some simple journaling cards for myself too (oopsie! another project I will have to make room for—but very worth it).

valentine's day kit

I know these photos don't relate but in a way they do. As cheesy as it sounds, Project Life will be my labor of love for me and for the family. I'm going to try to make it a creative outlet where I'm not as picky on the design of it all. I'm just going to dive in. Day one is all about getting organized and putting those first words to paper. Here I go...

Photos: New Valentine's Day kit in the shop!

• • •

Thank you so much to Kate Pruitt on DesignSponge for featuring my Etsy shop in her post 10 great etsy shops you need to know. So flattered to be included with such talent. I love every single one of those shops!

And thank you to those of you that have send in the kindest messages and emails about my new web site. I'm quite excited about it and it looks like it's all running smoothly.

a little hut has a new web site!

new web site! 

We're starting off 2012 with an awesome completed project. The new site for A Little Hut is here! It has been a long time coming and I'm very excited about this big improvement.

It was a LOT of work. It was a total team effort—I don't know what I'd do without my Mr. Z who did all the programming. He's so patient with all my requests! So, so patient.

Improvements:
- You will no longer need to wait for an email from me. You will be able to download all files immediately after paying for them. Only freebie files will need to be approved internally by me—which only means you'll just need to wait a bit (like with orders on the old site).
- You will be able to see your order history. You will have a handy list to remind you what you have ordered in the past.
- Products will be easier to find. The navigation from one section to another is quite simple.
- More photos and views will be available for products that I upload in the future. For now they have about the same amount of photos that I've used previously.
- I've added the icons below to clearly describe files that are available for each product. Some of you like to use cutting files, some of you want to print and cut by hand, some of you want to print only. Now you will know what is included in each set. The Product Information page explains these symbols in more detail.
For previous customers:
For those of you that have registered and made purchases on A Little Hut in the past don't worry, your information (personal contact information - not previous order history) was transferred to the new site. The only thing you'll need to do is create a new password. Sign in with your email address, click on Forgot Password, you'll get an email with a temporary password. Use that password to sign in and in My Account you can change your password to whatever you prefer. That's it! If you have any questions just use our Contact Us page. 

I think we accomplished what we wanted—a better experience for visitors and a more efficient and up-to-date site. I happen to like how it looks too! Hehe. 

If you find any glitches, typos or anything that you think we can work on please feel free to let me know. I want to make the site the best that it can be.

Stop by and visit the A Little Hut to check it out. I hope you like it!