how to make a paper hurricane cover

Here's an easy project for you. I enjoy lighting candles on rainy days like today and dressing them up a bit gives them a final touch. The interesting looking shadows it casts are an added bonus.

Materials:
- Letter sized card stock
- Xacto or craft knife
- Ruler
- Bone folder
- Glue stick

paper hurricane

Cut randomly placed triangles leaving 1/4" (6 mm) uncut border on one end and 1/2" (13 mm) on the opposite short end of the sheet. Keep at least 3/16" (5 mm) between each triangle, otherwise the hurricane will be too delicate. And don't worry about making the spaces between every triangle perfectly spaced.

The entire page doesn't need to be cut out. Leave some negative spaces (with no cutouts) that makes the layout more interesting.

paper hurricane

Use a bone folder to score four lines along the short side of the sheet. The thin spaces between the triangles may tear so be careful when going over the cut shapes. The four sides don't need to be equal in width. Notice how my hurricane isn't a perfect square?

paper hurricane

Score the 1/2" (13 mm) border of the sheet at about 1/4" (6 mm) from the edge. This will be the tab that will be used to glue to the inside of the opposite short end of the hurricane.

Place your hurricane over a tealight that is inside of a glass container. Enjoy!

paper hurricane

2010 paper + wood

paper + wood

As promised, here are my new pieces for the fall. This is a very limited edition of a family of paper + wood pieces that match my alphabet flash cards and Animal Friends fabric. I carried the idea of very small pops of color from the latter to these pieces as well. I cut everything except the wooden pieces by hand—so each piece will be slightly different from one another.

elephant

duck

My trees are also making another appearance. I loved cutting them by hand but I had to stop because it was physically painful to do. For a long time, I tried to figure out another way to produce them. It turned out that laser cutting them was the best option.


More pieces will be forthcoming and they'll be showing up in my shop and at my virtual table at the Poppytalk market this month. Please visit the market and check out all the beautiful work that is posted. There's so much to look at!

Happy Monday!

perfect time for an afghan

On one of our recent trips to the library, I saw this book sitting on a shelf just begging to be picked up. The cover alone drove me towards it because I've been wanting to make a blanket for a very long time. Somehow I could tell that I was going to like this book. Well, Comfort Knitting and Crochet: Afghans: More Than 50 Beautiful, Affordable Designs Featuring Berroco's Comfort Yarn didn't fail me. This is the first time that I see a crochet book and think that I'd be happy working on any of the designs. There are a few afghans that are more frilly in nature but for the most part they have a contemporary feel—totally me.

I picked one of the simplest of the designs and slowly but surely I'll have my blanket whenever the cooler temperatures hit. Just the fact that I finally remembered to start a blanket at this time of the year rather than wistfully thinking about it during our so-called winter, is a victory in itself. I'm telling you, it has me rubbing my hands together like a kid in a candy store.


If you remember this blanket, I pulled it apart and started this new one with the some of the same yarn. It was white and off white but the contrast between the colors wasn't strong enough for me. This one will definitely make more of a statement.

So here I am, still in a brown and white phase and trust me the picture in the book didn't help any. I'm stuck with this color combo like I was stuck with black and white when I was teenager. Back then all my furniture was white, my comforter was a black and white checkered design and there was zero color anywhere else. My mother did mention a few times that my room was missing some color but she let it be. Now I have my little C taking after her grandmother with an occasional comment or two about the lack of color. We are all women of strong opinions around here.

These are other designs that caught my eye.


Friday Tidbits
- Postcarden - I posted this on twitter the other day but I just had to repost here. I just think these are so clever. Not very practical, but very clever.
- Michael Lee - I love these pieces. They make me want to drop everything I'm doing and just grab some paper & cut, cut, cut.
- Anna Maria Horner - Not only is she an extremely talented designer but boy oh boy can she write. This is another twitter repost but so worth it since it's the beginning of the school year. Grab a box of tissues. You've been warned.

I'll have a busy day working on some things that I'll share on Monday. I can't wait to show you!

Have a great weekend!

PS - In the interest of full disclosure, the link for the book is my Amazon affiliate link. I earn a little something any books that are sold here. I hope you don't mind.

the basics: how to get rid of raised edges on cut paper

the basics

Today I'm going to start a weekly post about basic tips and tricks that I use when working with paper or any other craft for that matter. These will be very easy things to learn and mostly for beginners—if you're past that stage then please bear with me.
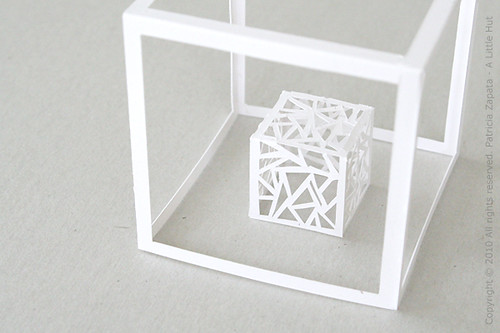
Since the 
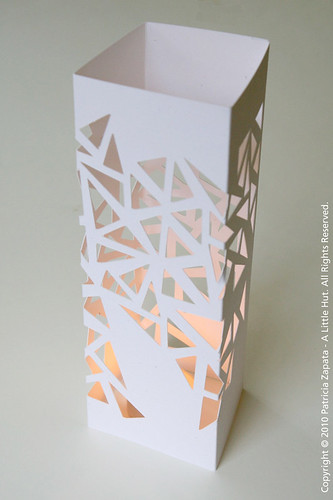
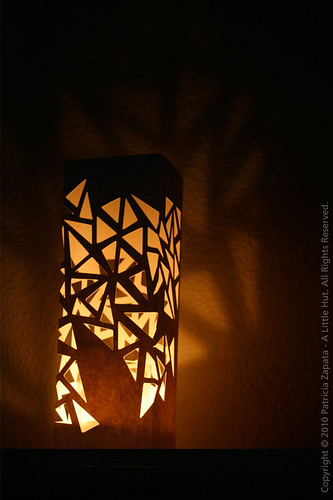
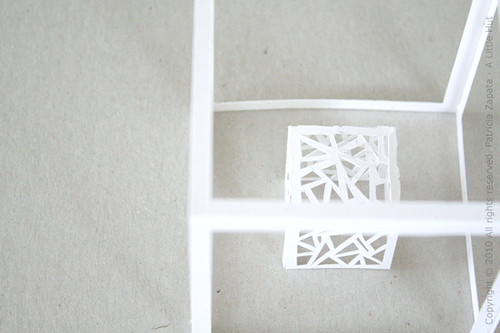
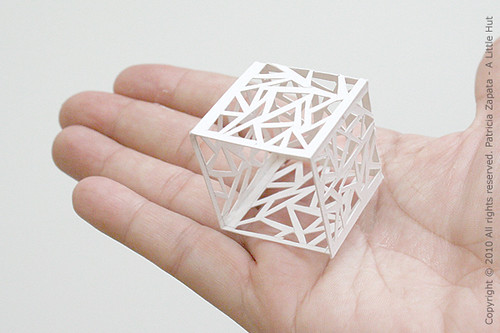
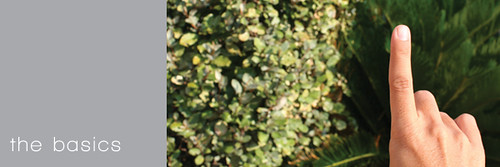
paper cube is the last item I posted, I thought I'd start with one very important tool: my fingernail. That sounds a bit strange doesn't it? But, yes, that is an important tool that I use when working on hand cut pieces.

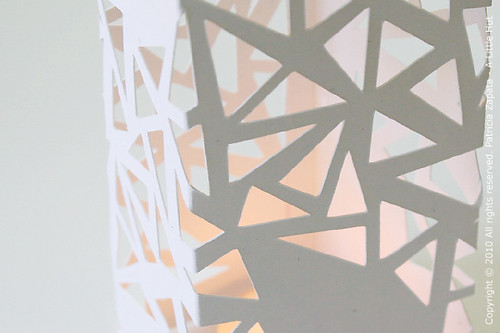
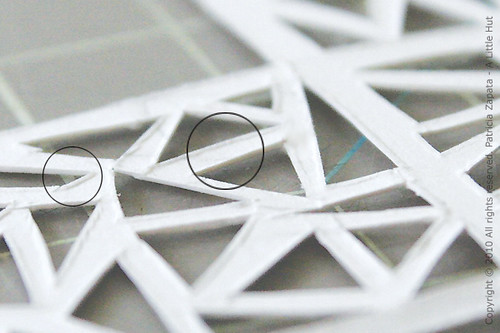
Typically, when a blade isn't extremely sharp, you'll notice that when a shape is cut out of card stock or thick paper, the outer edges of the paper that's left behind, are a bit raised. There are several examples in the photo but I've circled the most noticeable. See the shadows of the raised edges?

before

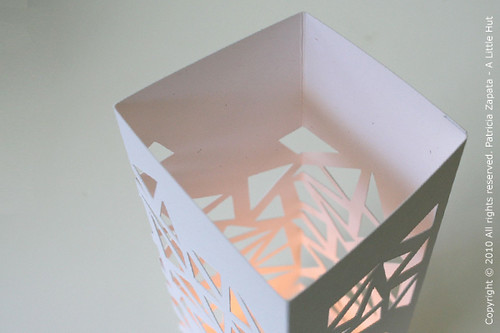
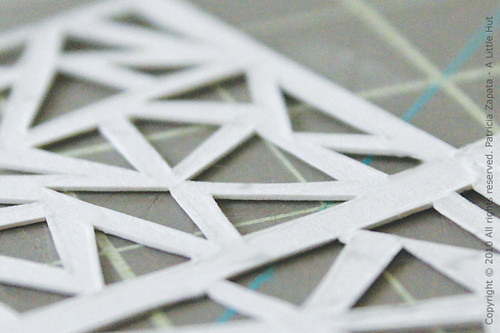
Here the raised edges are all gone. The piece is completely flat. See the difference? There are probably many ways to do this but I go with what is quick and handy. That's why I use my fingernail. I simply lay my nail flat against the paper and rub it across all the edges until I don't see any more raised edges. I don't feel a piece is finished unless I've done this.

after

Important! - To be safe, first place a sheet of office paper or something similar over your artwork, then start rubbing all over it. Otherwise you run the risk of tearing up part of your artwork. Sometimes I don't follow my own advice and I've paid the price for not doing so. When I do use an extra sheet, I lift up the paper several times in order to see where more rubbing needs to be done.

I don't use a burnisher or any other kind of tool because I feel I have better control when using my hands. I can also feel where the edges of the piece are and can work quicker.

A word to the wise—don't do what I've done before. Never do this when your nails have nail polish on them. That should go without saying, right? Nothing like a colored streak across a perfectly clean piece of artwork! Talk about having a want-to-kick-myself moment.

If you have any questions or suggestions for The Basics, please feel free to add them in the comments section or email me if you'd like to keep it more private. I'd love to hear from many of you and I hope this helps!

Have a great day!

frame of mind

revisited

I've kept looking at my cube wondering what the next step is and this is what I've come up with so far—a frame. Originally, I was going to place the smaller cube suspended in the center but it seemed a bit obvious. For anyone that's curious—the frame is a 4" (10cm) cube.

revisited

revisited

If any of you are wondering why I 'waste' my time with this—the truth of the matter is that I'm not too sure how to put it into words. I think it's just a matter of having something neutral to work on. It's not related to either one of my businesses, it's not client driven, there's no deadline and the outcome won't affect anything. It's a mental break type of project that allows me to be more productive when I get back to my 'real' to-do list.

Working with paper relaxes me. I'm curious... what relaxes you?

making ideas happen

I have a confession to make. I am a creator of many ideas that for the most part never come to fruition. It's as simple and as frustrating as that. My mind is constantly clicking away and when I think I've solved something or come up with a good idea I write it down or sketch it in the Moleskine that never leaves my side. I feel comfort knowing that my ideas are tucked away and won't be forgotten. The latter part is a complete delusion and that's where my problem lies.

I do forget that I have these potential gems (or a few lumps of coal—if I'm honest) that are waiting to see the light of day, but they never do. Very few of my ideas become actual living/breathing projects. I've always known this and I've never really found a solution or a way to jump the hurdle—until now—I hope.

I just finished reading Making Ideas Happen (by Scott Belsky) and this is the first time I feel like I have a genuine idea of how I can tackle my projects wish list and actually get them to the finish line. This is also the first time that I feel comfortable recommending a book like this.

From the book:
—Creative people are known for winging it: improvising and acting on intuition is, in
some way, the haloed essence of what we do and who we are. However, when we closely analyze how the most successful and productive creatives, entrepreneurs, and businesspeople truly make ideas happen, it turns out that “having the idea” is just a small part of the process, perhaps only 1 percent of the journey.
For those of you that have the innate ability to organize projects of any kind and complete them without letting them go by the wayside, this is not the book for you. For those of you that are more like me, I highly recommend it. To help me appreciate my progress even more I've also decided to start my page on Behance.


So here's to making our ideas happen!

short on words

Sometimes there are 'just because' projects. This is one of them. I grabbed my Xacto, a scrap piece of paper and with no initial plan in mind, this is what turned out.


Friday Tidbit
Shibori DIY - I've read about this before but this is an excellent tutorial.
Dalton Ghetti - Look at these amazing sculptures!

• • •

On the home front... uniforms and backpacks are purchased. Next Wednesday the kids start school. It's going to be so quiet around here. Bittersweet.

Have a great weekend everyone!

new patterns on spoonflower

These are two designs that I've posted on Spoonflower. One is an older design and the one on the right is the latest one I played around with in the spring.

Some of you may wonder about my occasional ventures into fabric. The truth of the matter is that I really would love to see these on paper. While that happens (if it does, that would be another can of worms—albeit an exciting one to tackle) I like my patterns to at least see the light of day.

spoonflower

The fabrics with yellow in them will become cushions that are badly needed around here. We'll see if I like them when I get them done. Aside from our yellow kitchen our living room, studio and entrance spaces are decorated with neutral earthy tones and I know these would seriously jump out. But it doesn't hurt to try, right?

• • •

Thank you to OhDeeDoh for including my Alphabet Flash Cards in an adorable grouping of school-inspired decor.

weekend

The end of our summer break is a week and half away so we figured that we'd celebrate by visiting San Antonio (3hrs away), do the whole touristy thing and eat a lot of ice cream to beat the heat. We hadn't visited the main attractions in a very long time so it was great to see them again through the kids' eyes.

The view from our hotel room.


Our hotel from the river side.


Sunday morning stroll.

riverwalk


The most visited tourist site in Texas—The Alamo.


The kids were so proud to be signing the guest book (never mind that photos aren't allowed inside the Alamo... oops).


Another reason why we decided to make the weekend special... on Monday, August 9th we will be celebrating our 13 year anniversary (here are a couple of photos). I married Mr. Handsome, Mr. Heart of Gold, Mr. Patient and he's still all that and more.

going green with yolanda green

preview

Yesterday I shot a couple of segments that will air locally on Going Green with Yolanda Green. I always forget how wiped out I am after these sessions. Phew. The thing is I always have a lot of fun doing them too. It all balances out. I'll post the videos as they air. For now you can check out a couple of photos of us working in our kitchen yesterday on my new A Little Hut Facebook page.

I worked on two recycling projects. The first was the security envelope stationery set and the top photo is a sneak peek for the second one (love the colors!).


The kids start school two weeks from today so I'll be taking the next few days to enjoy my time with them. I'm sure you understand. It's that bittersweet part of the summer... I crave our school schedule/routine but I also love having them with me. Sigh.

Be well my friends!