
Yesterday I had a little break that I needed to fill with making something—anything. You know that feeling when your hands need to be busy?
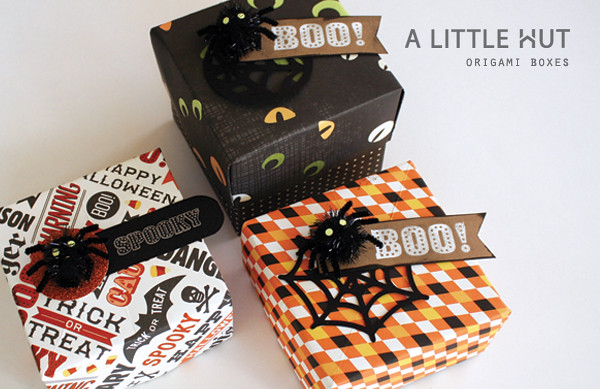
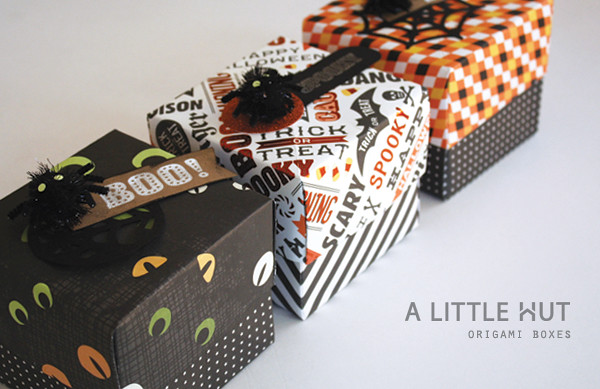
I stood in front of my materials and tools and I decided on tackling something for Halloween. I ended up making some goodie boxes for the kids and my Mr. Z.
When I was completely done with the folding, stamping, decorating, etc. I thought that it would be fun to figure out how to make them larger without having to resort to making a geometric/complicated project and using what I had already finished.
[Confession: There are times that when I make something for fun I don't like using my computer or cutting machine. I think that's why I enjoy crocheting and knitting so much—no fancy gadgets—just your hands and yarn. The same applies to paper projects. Just give me some scissors/trimmer, paper and glue. Bliss! Then again there's the occasional "just for fun" project that ends up like this—talk about a lot of math—lol!]
Materials
- Spider webs from my Halloween Kit
- Spider webs from my Halloween Kit
- Martha Stewart Crafts Designer Paper Pad, Carnival
- Martha Stewart Crafts Cling Rubber Stamp Set, Carnival
- Martha Stewart Crafts Sticker, Carnival Pom-Pom Spider (surprise! when I placed the boxes in a dark corner last night I discovered that the spiders' eyes glow in the dark—very cute! I'm surprised it isn't mentioned anywhere on the packaging.)
- White embossing powder
- Silver embossing powder
- Strips of black and kraft paper
- Martha Stewart Crafts Heat Tool
- Martha Stewart Crafts Cling Rubber Stamp Set, Carnival
- Martha Stewart Crafts Sticker, Carnival Pom-Pom Spider
- White embossing powder
- Silver embossing powder
- Strips of black and kraft paper
- Martha Stewart Crafts Heat Tool
Steps for the top and bottom of the box
To make the origami boxes simply follow the steps here (you just need to watch the first 2:40 minutes to do what I did). I used to make origami boxes by using scissors in one step. I no longer make them that way.
Paper sizes:
Top of box: 12" x 12"
Bottom of box: 11.5" x 11.5"
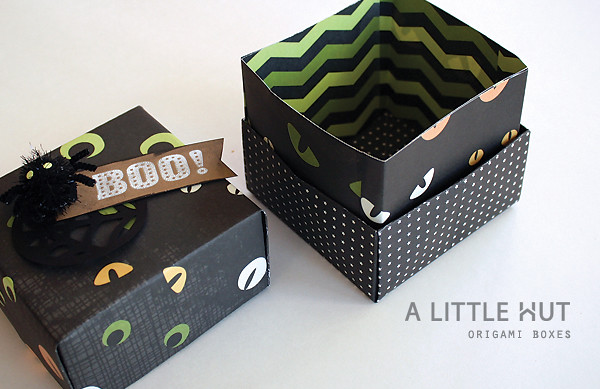
Size of the finished box with extension: 4" x 4" x 3.5"
Steps for the extension
- Cut two pieces of paper that are 3.5" x 11.5"
- Fold each one in three sections by sliding a sheet inside the bottom box and pinching it where it meets the corners. Pull it back out to crease completely.
- Repeat the process with the second sheet.
- Glue the sheets to one another as you see in the bottom graphic (two U shapes facing one another). Make sure that they are going to be in the right position—not to tight to slide into the box and not too loose either.
- Once the glued pieces are dry tuck them back into the boxes and there you have it—larger boxes!
In the photo above the extension is just placed inside the box and I hadn't glued it to the sides. As you can see, this is definitely a way in which you can play with what patterns are placed inside vs. outside.


Now that all the boxes have the extensions in place they are almost twice as big and the patterns of the bases are visible. Can you see how this can translate to Christmas or any other occasion?
The embellishments for these boxes are really simple. I simply selected a stamp and heat embossed it onto a strip of black or kraft card stock. Each strip is stacked with either a cut out of a web design or a glitter paper circle and a spider. That's it!
Have a wonderful weekend everyone!
- Cut two pieces of paper that are 3.5" x 11.5"
- Fold each one in three sections by sliding a sheet inside the bottom box and pinching it where it meets the corners. Pull it back out to crease completely.
- Repeat the process with the second sheet.
- Glue the sheets to one another as you see in the bottom graphic (two U shapes facing one another). Make sure that they are going to be in the right position—not to tight to slide into the box and not too loose either.
- Once the glued pieces are dry tuck them back into the boxes and there you have it—larger boxes!
In the photo above the extension is just placed inside the box and I hadn't glued it to the sides. As you can see, this is definitely a way in which you can play with what patterns are placed inside vs. outside.
Now that all the boxes have the extensions in place they are almost twice as big and the patterns of the bases are visible. Can you see how this can translate to Christmas or any other occasion?
The embellishments for these boxes are really simple. I simply selected a stamp and heat embossed it onto a strip of black or kraft card stock. Each strip is stacked with either a cut out of a web design or a glitter paper circle and a spider. That's it!
Have a wonderful weekend everyone!
No comments:
Post a Comment