
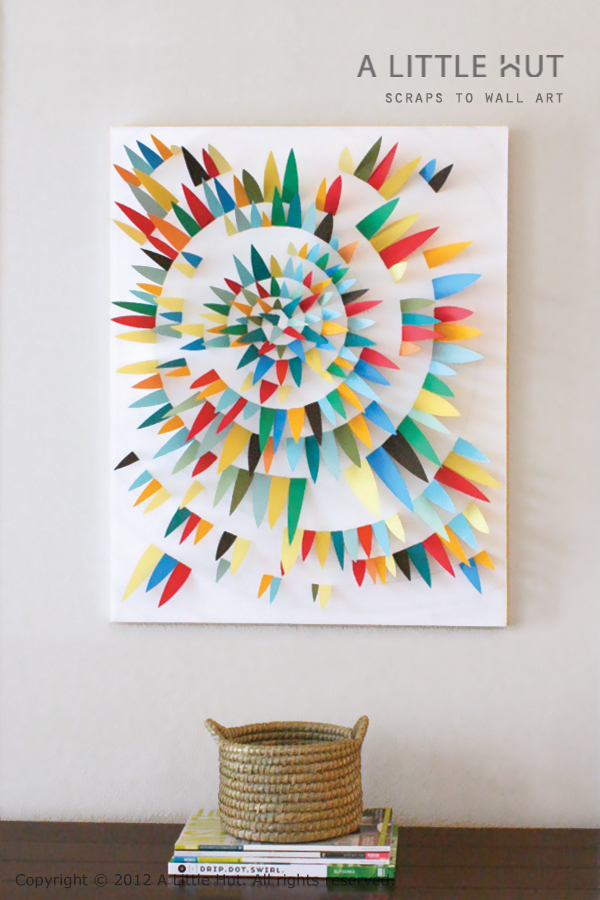
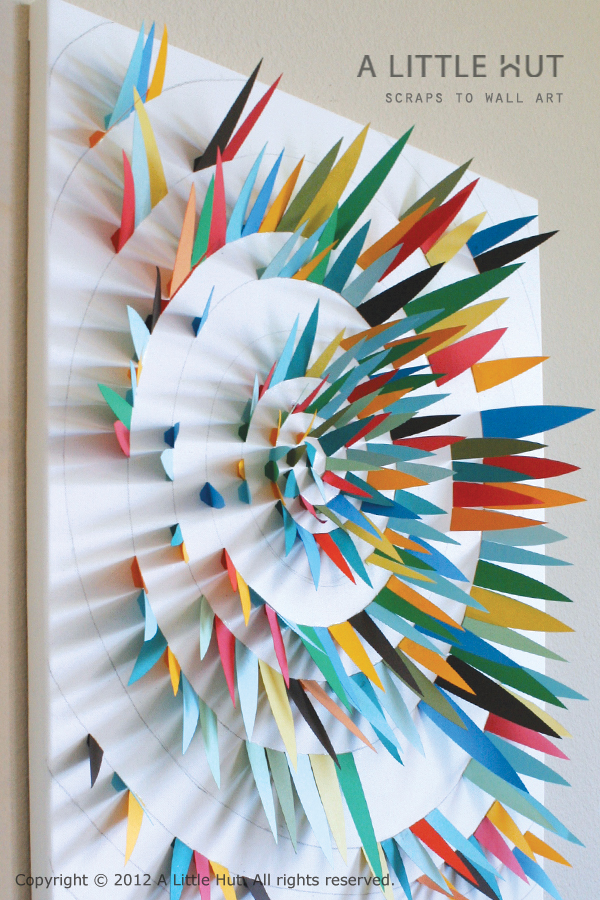
Something that every paper crafter has after a completed project is a pile of scraps. I'm no different and let me tell you my pile of scraps can get quite out of hand! To put it to good use, this solution is really simple, uses up a lot of scraps and can be made leisurely over a long period of time.
I don't remember exactly how the idea for this piece came about but I can tell you that I made it many months ago and as I walked by it the other day it occurred to me that it was high time that I share it with you. I have the step-by-step photos of the process because it was going to be part of a book that never came to fruition (I would've loved a close up of this project for the cover).
Since we've had it on our wall for weeks and weeks I can also tell you that it holds up really well and yes I did actually use my scraps—no new sheets of paper were harmed for this project. ;)
Materials
- Scraps of card stock paper
- Scissors
- Glue
- Canvas
- Pencil
Steps
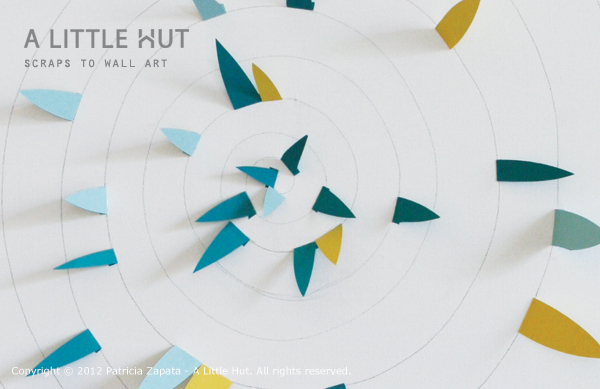
1. Lightly draw a spiral that starts a little off center and gradually expands throughout the canvas. Don't worry about making the spaces between each spiral even. Just gently move your arm around and around and it will come naturally. If you feel you need it, practice on a scrap piece of cardboard or on the back of the canvas.
2. Cut out scraps of paper in the shape of a leaf that has a flat end (my scraps where about 1" (2.5cm) wide and varied in length. Fold 1/4" (6mm) of the flat end over to form a tab. Cut off the corners of the tab as seen in the scrap on the right hand side in the photo below.
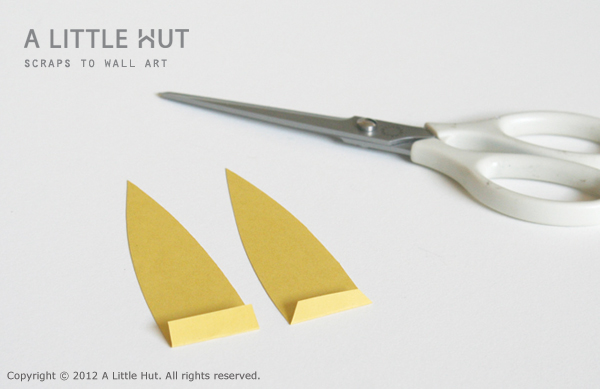
TIP! Don't cut all your scraps at the same time and at the same length or width. Variety makes this more interesting. The spacing in the spiral may vary in different sections so cut your pieces as you decide where to place them. I made sure that my "leaf" shapes where at least 1-2" (2.5-5cm) past the line of the following spiral mark. Remember these are just scraps so if you cut one that is too short or too long, it's not a big deal.
3. Glue the scraps to the canvas by lining up the edge of the folded tab over the pencil markings of the spiral. Make sure that you cover the pencil markings as you add paper to the canvas.
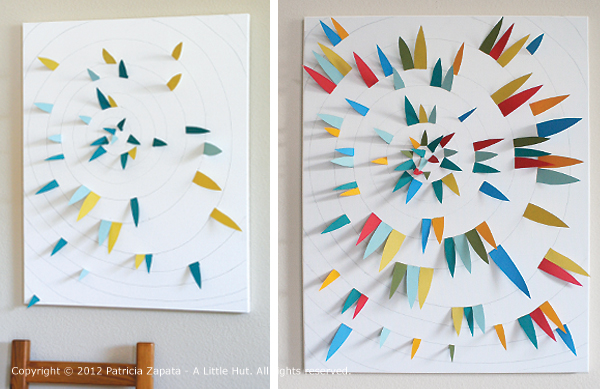
4. Continue until you feel you're done or until all the pencil marking are covered. I decided to stop where I did because I felt like I didn't need to fill the entire canvas (although that was my initial thought).
To finish off the piece I thought of erasing the pencil markings. It didn't work. The small part that I tried got smugded and looked awful. The drawn spiral now seems like part of the piece and I feel like it'd be missing something if I got rid of it.
TIPS!
- Take your time
You probably won't have time to do this in one shot. Place a basket in front of your canvas with scissors, some scraps and a small bottle of glue and add pieces whenever you have a few minutes. It doesn't have to be a one afternoon project—it really can be something that evolves over time. For the curious—my piece was made over a couple of days at a crazy pace. I only did that because I was on a deadline, otherwise I would've taken my time with it.
- Spread out your favorite pieces of paper
If you are doing a multi-color or multi-pattern version of this make sure to spread out the scraps of one sheet of paper throughout the piece. It'll give the piece a bit more balance. It helped me to squint to see where I was missing paper of a certain color.
- Make tiny versions of this to place inside of shadow box frames or for the front of an abstract card.
- Use only one color of paper in different shades for a monochromatic look.
- Make your cut out shapes with a rounded tip (like petals) for a softer look.
Great for babies too!
When I babysat my adorable 3-month old nephew, for a few days during the summer, I discovered that this is perfect for babies. He LOVED it. He couldn't stop staring at it and would completely calm him down if he was a bit upset for whatever reason. It completely commanded his attention and he'd forget about everything else. It was pretty fascinating to watch.
I hope that you like the project and that you give it a try. Have fun with it!
This is so great! Definitely want to add this to my list of to-do projects!
ReplyDeleteThis is so fabulous!! Just gorgeous!
ReplyDeleteStunning! Wow.
ReplyDeleteEstá increíblemente divino! Gracias por compartir Paty. Un abrazo.
ReplyDeleteGreat project.
ReplyDeletelove it
ReplyDeletewow! This is really amazing!!
ReplyDeleteGenius. If I was a paper scrap, I'd want to live at your house!
ReplyDeletelol. that made me laugh out loud!
DeleteBeautiful!! :) I wonder what it would look like if the scraps of paper where cut out from pictures....... maybe black and white pics??.....mmmm
ReplyDeletethat'd be interesting. the great thing about this project is that no two will EVER look alike.
DeleteYou always have new, wonderful surprises on your blog - your imagination is endless - thanks for the inspiration!
ReplyDeleteYou always have new, wonderful surprises on your blog - your imagination is endless - thanks for the inspiration!
ReplyDeletethanks! I wish it really was endless on those days that I get stuck! :)
Deleteawesome patricia !!!
ReplyDeletelove it
this project rocks!! thanks for sharing all the steps.....i've got a floor full of scraps just waiting to be spiraled!! :))
ReplyDeleteooh! I'd love to see!
Deletesimple steps but awesome! :)
ReplyDeleteThis is BEAUTIFUL! I am completely copying this for my kids' rooms! Or maybe just one for my bedroom! SO happy that I found your blog. :)
ReplyDeletePrecioso!!!!
ReplyDeleteLovely pictures and lovely for kids' room.
Kisses from Spain.
Raquel www.pequealamoda.com
I don't know HOW I missed this - it is absolutely fabulous!
ReplyDeleteSharing on my FB page now!
I really like this! gonna give this a try! ;)
ReplyDeletelove it!
ReplyDeleteWow, Ann Martin, of allthingspaper.net, shared your art on her site.
ReplyDeleteI am really impressed. So simple, and eye catching.
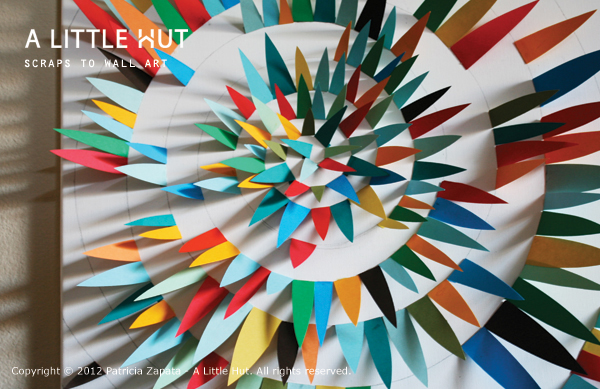
Hi Patricia, This is amazing! My husband and I have just sat starring at the image for a couple of minutes before scrolling down to see how you made it. We were trying to work it out because it looks like such an optical illusion. At first, it appears that the scroll is 3D, protruding outwards, until we realised it was the shadows of the scraps creating the effect along with the pencil line. Very, beautiful work!
ReplyDeleteLove this idea. I am going to try it soon :)
ReplyDeleteSuch a clever and simple idea and it is so beautiful. No wonder babies love it!
ReplyDeleteWOW! What an amazing gift of imagination you have! How did you get the idea for this amazing art? What inspired you? and how can I get some? :) creative blessings! kingsley surceelove.blogspot.com
ReplyDeleteOh my I love this!!!
ReplyDeleteHow unique and so simply to do! My daughter would love this project. Thanks for sharing!
ReplyDeleteBRILLIANT!
ReplyDeletewhat size canvas did you use? I want to do one but horizontally for over my fireplace and possible paint the canvas black...I just want to get an idea of how big yours is and how big I should do mine. :) Great job, you're so creative!
ReplyDeleteMy canvas is 24" x 30".
DeleteHave fun and thanks for the kind words!
Totally, totally, totally cool.
ReplyDeleteHaces unas cosas preciosas, gracias por compartirlas.
ReplyDeleteVery cool, I am going to use it in my school. Children must work together in a group en make this very nice picture.
ReplyDeleteWow! I love this. Definitely going to have a go and make my own. Love using up those scraps :)
ReplyDeleteBrilliant!
ReplyDeleteWow :)
ReplyDeleteWe home school our 7 year old and 5 year old. Each year they participate in a gallery event with our local group. This will be my 7 year olds art project. I love it! I can't wait to see how his version will turn out. Thank you!
ReplyDelete