
Materials:
- strip of paper
- strip of fabric that has raw edges all around and is wider than the paper
- spray adhesive or glue
You'll notice that I didn't include any measurements for these materials. It all depends on the size of the box and whether you prefer a wider band or not. Just make sure that the fabric is wider than the paper and that both can go all the way around your gift box.
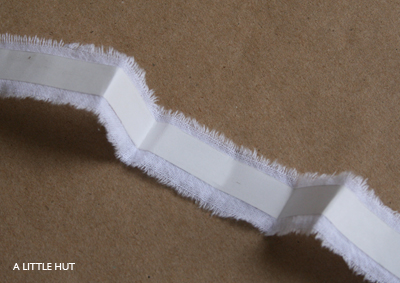
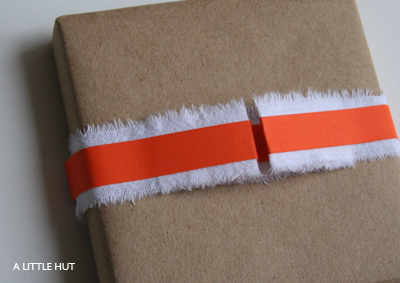
Glue a strip of your chosen paper on to your fabric and make four folds. The two center folds need to be at least 2"or 3" apart - this is where you'll write your to/from message. The outer two folds go outward and will meet in the center. The photos below illustrate this. Make the creases of the folds nice and crisp and then glue the whole thing (folded) onto your gift box.

Here I've used a different color of paper to show how contrast can make this tag more attractive. My white-on-white version looks much better in person. Experiment with the use of different textures, colors of paper and fabric. Make it your own!

Yes, the tag doesn't exactly stay closed. I actually like that. I don't think it would look as interesting if it were completely flat.
Here's another tag using the same materials and general idea. This is just a strip of fabric with paper on both sides (to make it sturdier). The raw fabric edge goes all the way around. I made this a narrow long tag but it can be any size and width that you prefer. A tip - if you make this tag make sure to cut a tiny hole in the fabric before gluing it to the paper. This way your hole punch only needs to cut through paper. I learned that the hard way. ;)

Here is a failed version of a tag (at least in my opinion). I used the same technique for making a magazine bowl. I made a ring instead of a tight center by using the bottom of a tall skinny mug as a mold.

In my mind the idea was much better. It's in the trash now. :( The bottom two red strips were to be used for the to/from message. I decided to show this failed option because it may inspire someone else to take it further, make it better or create something completely different. After I decided that I didn't like this idea at all I actually wrapped the ring of paper with a torn piece of fabric (the same white one I used above) and it turned out to be a funky looking and very sturdy bangle. I won't use it because it's not exactly my taste but it may be food for thought for someone else. That's why experimenting is fun. You never know what you'll come up with.
Thank you!! -- To Natalie for mentioning my first gift tag tutorial on the Craft blog. I mentioned it on my Maker Faire post but I'll say it again. I also owe her and Jenny Ryan a big thank you for giving me an Editor's Choice blue ribbon at the Faire. The list of winners was posted this week here. Last, but not least, a thank you to Whip Up for posting my magazine bowl project. :)
Did you just use regular PVA glue (white glue to you)? I'm feeling inspired!
ReplyDeleteI actually used Spray Adhesive to glue the fabric to the paper strip and double sided tape to glue the whole thing to the box.
ReplyDeleteI'm inspired, too! The ribbon tags are so beautiful. I really like the fact it has a little dimension instead of being completely flat. Really lovely!
ReplyDeleteSo lovely and inspiring!! :D
ReplyDeleteGreat tags - I love the idea of forming them and giving them some edge. The ring one is particularly nice!
ReplyDeleteSo beautiful! Thanks!
ReplyDelete