
I was given the fantastic opportunity to work with the new EKSuccess Tools that are hitting stores now. I decided to make flowers because they are definitely one of my favorite paper crafts to make. They can be used for so many projects—framed 3D art, scrapbook pages, cards, as party decorations, gift toppers (like above!), Christmas ornaments, etc.

The first thing that caught my eye about these tools is the new packaging. It's bright, cheerful and each product includes an inspiring project photo and QR code that can be scanned for more information.

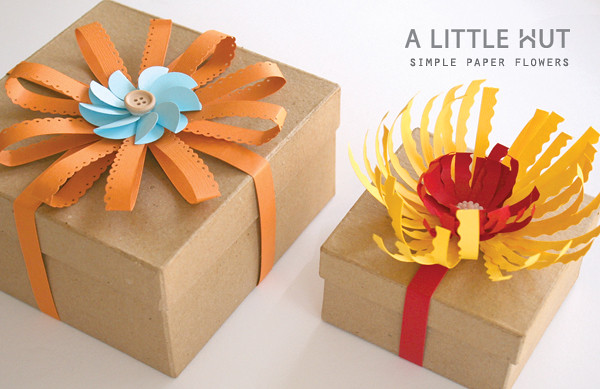
ORANGE FLOWER
Materials:
- Orange card stock
- Blue card stock
- Rotary paper trimmer
- Dotted scallop edge punch
- Permanent adhesive dispenser
- Medium circle punch
- Foam dot circles
- Button (or other embellishment)
- Glue
1. Using the rotary paper trimmer cut 5 1/2" strips that are 12" long.
- I didn't need to use the extended measuring guide that you see to the left but I opened it up to show you the additional feature. When it's not in use it neatly tucks in under the main section of the trimmer.

2. Using the edge punch add the cut out design to one side on each of the strips.
- I love the fact that the EKSuccess Tools punches have a mechanism that allows the punches to lock into a flat position (easier storage!) when they are not in use.

3. Use the permanent adhesive dispenser to glue the tips of the strips towards the center of each one. Glue all the strips (that look like elongated 8 shapes) one over the other in crisscross fashion and set aside to dry.
- I was looking forward to testing this adhesive dispenser because I've always had bad luck with other brands. Other dispensers have unraveled (à la old cassette—remember those?) but the EKSuccess Tools version worked perfectly from the start. Finally one that works for me!

4. Using the circle punch cut out 10 circles out of blue card stock. Fold 9 circles in half and glue around the edges of the remaining one.

5. Add a button to the center of the flower using one foam dot circle to make it a bit elevated.

6. Glue the blue flower to the center of the orange base. Done!

YELLOW FLOWER - Another flower that is even easier to make!
1. Using the rotary paper trimmer cut several strips of red and yellow paper into 1/2" wide strips
2. Use scissors to cut the strips into 3" lengths and split them down the middle (lengthwise) with a pair of EKSuccess Tools decorative scissors.
3. Curl each strip with the bone folder.
4. Glue the yellow strips around the edge of a piece of paper punched out with the 1" circle punch.
5. Glue another circle on top of all the strips (red circle)
6. Glue the red strips in the center in crisscross fashion.
7. Add a button or embellishment to the center and you're done!


For more information about EKSuccess Tools and more inspiration please visit their Facebook page and Spotted Canary (for project ideas) and a cute video here. The new EKSuccess Tools can be found in WalMart stores.
I received the EKSuccess Tools products and was compensated by Blueprint Social on behalf of EKSuccess but all opinions are my own.

No comments:
Post a Comment