
Materials:
- a magazine (I didn't use more than half of a magazine)
- glue gun
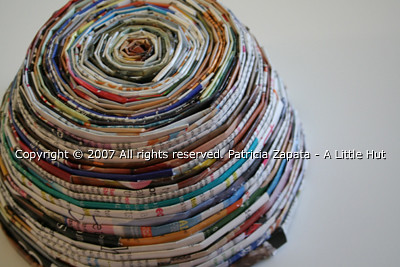
I started by making a tight little roll and making the flat circle that I showed you the other day. This can also make a useful trivet if you continue the flat shape to the desired size.

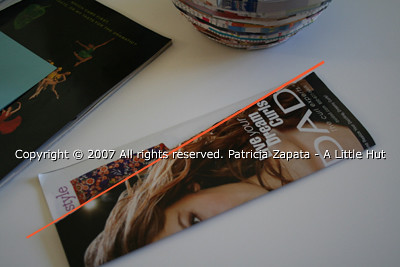
Each strip that I used is made from one page of the magazine. When the pages are torn out don't worry about them being perfect. Fold the page in half (the long way) pretending that it is a complete rectangle and make the sides line up. The photo below shows a page that I tore out. It's really crooked (I drew an orange line to show that a little better) and it still works. I folded each piece in half four times until I was left with a strip that is about 1/2" inch (about 13 mm) wide.
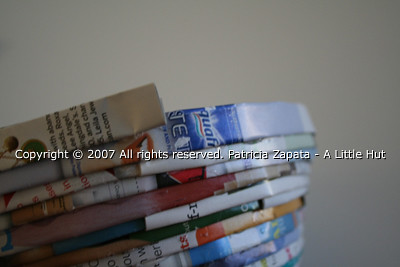
I added each strip to my piece by keeping the folded edge outside and the open side toward the inside. When I decided that my base was wide enough (5 in. across or approx 13 cm) I started going up by placing each strip about 1/8" (approx 3 to 4 mm) above the previous row.
As you place each strip down only do so a short piece at a time because the glue dries really fast. I didn't use something like Elmer's glue because that's the opposite - takes too long plus it makes the paper bend our of shape. For a cleaner look I only used a very thin line of glue. It was more than enough and it didn't seep out from under the edges.
I glued each strip of paper down, leaving a small piece unglued so that I could tuck in the following strip under it. See two photos below.
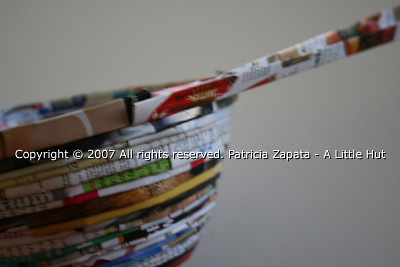
Here's my unfinished bowl. I'm not sure if I'm done yet because it may become more of a vase shape if I keep going. For obvious reasons if you decide to make a vase use a water proof container on the inside. The only thing that is really missing is to make the last row all even so there aren't any stray paper ends as you can see in the photo below.
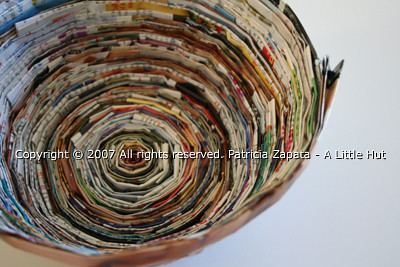
A photo just to show the scale of the bowl. I like the look of the colored pages but I'm also interested in seeing what it will look like if I spray paint it a solid color. The texture of the edges of the paper would probably look interesting. Since I've started seeing Halloween decorations at the stores I can totally see this spray painted orange and full of candy! Can't you?
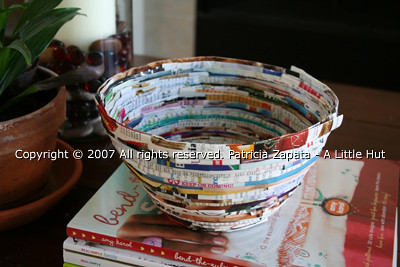
The beauty of this project is that you can make the bowl any size you'd like by changing the width of the base and by stopping at any point during the process of building the sides. I'm thinking that this bowl will look nicer if it's part of a set. So I'll probably make a couple more in different sizes.
By the way, I dropped the bowl a couple of times while making it and nothing happened to it. Nothing. It is really sturdy because of the thickness of each strip and because of the glue. So it's totally clumsy person and/or child proof too! :)
UPDATE - The bowl in these photos is over a year old now and it has been through a lot. It didn't have a set purpose until we recently started tossing our keys in it everyday. If you have any doubts about it durability I have proof that it takes a beating and still looks great. Just thought I'd share that.
This bowl is also part of 33 projects found in Home, Paper, Scissors, my first paper craft book. More details can be found here.
What a great idea! You do great things with magazines and paper. :)
ReplyDeleteLove it! Thanks for all the great pix showing "how to". I'd love to see it again if you decide to paint it. How long did it take to make?
ReplyDeleteThanks! :)
ReplyDeleteI think the bowl took me a total of about 4hrs to make. I only worked on it a little bit at a time and a very leisurely pace.
Your patience astounds me... but what a wonderful result. Your bowl looks amazing!
ReplyDeleteThat is a really good idea, looks great, I love things made out of printd literatre, just being able to catch fragments of thought etc.
ReplyDeleteHmm... I may have to give this project a try. I always need more receptacles in my studio for scraps + whatnots. Great idea!
ReplyDeletebeautiful! I love it plain. Have you seen this?
ReplyDeletehttp://www.zanisa.com/products/Paper_Spiral_Necklace-553-7.html?scroll=-6019
What a great post, Patricia! I've been mulling over the mechanics of these magazine-coiled projects for a while now, and your photos are extremely helpful. Thanks!
ReplyDeleteI love this bowl! Think I may have to make one myself! Thanks for the tutorial.
ReplyDeleteThis is so cool; I love it! Thanks for sharing :)
ReplyDeleteI like the Halloween candy dish idea!
Delurking to let you know that this is my favorite of your recycled projects. I love it!
ReplyDeleteAwesome project! Now I can put all those magazines I've saved to good use...
ReplyDeletei have been wanting to do that but never did. now you have inspired me!! thanks!
ReplyDeleteLove it!
ReplyDeleteWell you SAY it is easy...glue guns and magazines, I'll give it a try. Maybe if I start out small?
ReplyDeleteWow!! Thanks everyone! I'm so glad that you liked the project. I had fun making the bowl because I think it was the right time to make a project that I didn't need to concentrate too much on. When you finish your bowls I'd love to see them!
ReplyDeleteI love it, awesome as usual. Everytime I visit there are so many great things to see and learn.
ReplyDeleteThis is such a fun project! I tried it out. Not perfect but ok for the first try - http://www.flickr.com/photos/libookperson/1424078168/
ReplyDeleteThanks Patricia!
wow, this is so cool! i love it! i think i'll give it a try! -kb
ReplyDeleteI can't wait to do this project with my daughters. Simple yet lovely!
ReplyDeleteYour paper art is beautiful! I am still exploring!
That is great!! I really love it!
ReplyDeleteKudos on your mastery of paper!
Helo, boa tarde.Muito bonito o seu trabalho, bls do Brasil
ReplyDeleteI like this idea of recycling and I have never seen it before!
ReplyDeleteI love this bowl! What a great project. I made a spiral rag basket from old jeans awhile back---kind of the same idea. There's something so satisfying about turning 'trash to treasure'! :)
ReplyDeleteHi Patricia,
ReplyDeleteA very novel idea. I think I can use it as a fruit basket or to keep pens, pencils, erasers & other stationary items.
Or maybe to keep some wrapped sweets. Besides as you mentioned it’s unbreakable.
Hi
ReplyDeleteI found you and I will came back for sure! I love this idea and i'm going to try it if you don't migth, o.K.? and after i done I wll put the bowl in my desk!
love your illustration and your paper cut's too.
you can make a waste paper basket.
ReplyDeleteThanks for this inspiring how to (and for the rest of your lovely blog). I tried making a coaster today, here's the result:
ReplyDeletehttp://krumbukta.blogspot.com/2007/10/sabotaging-studies.html
Great idea! Thanks!!
ReplyDeleteI love the bowl! Do you think there's something you could put on it to seal it and make it harder? Like, Modpodge or something?
ReplyDeleteoh, i can't wait to try this. your photos make this look like such a tempting project!
ReplyDeleteThis is such a great idea! Your bowl turned out lovely. Thank you for sharing it.
ReplyDeleteYour idea is just lovely!! I am going to try it soon!!! Great work.. keep going.
ReplyDeleteThis is great... thanks so much for the detailed instructions!! FYI, for anyone who doesn't own a hot glue gun or has a tendancy to get burned by it, try Aleene's Quick Dry Tacky Glue. It's like Elmers on steroids. It's especially nice if you've got little one's around and you don't want to get out the hot glue gun due to safety reasons. I'm very excited to try this!!!
ReplyDeleteLovely bowl, very original. I´ve discovered your blog thanks to We love crafts, and I love everything you do. Congratulationes
ReplyDeleteI tried making one and only got the bottom done. It didn't seem to work when I made the sides. I'll give it another shot, after reading the instructions again.
ReplyDeleteRight now a have a pretty cool coaster, though. ;)
This is an awesome idea! I just made a vase using this exact technique! it was fun... i decoupaged it, in order to make it sturdy. ;)
ReplyDeleteFantastic!!! :))
ReplyDeleteI love this! Me and my roommate are going to make some for the coffee table! Thanks for the idea!
ReplyDeletewoow it's great , good case
ReplyDeletetotally awesome bowl. I wonder if I have the courage to try one!!??
ReplyDeleteI saw these in Nordstrom, but they were very expenive. Though they were made very tight and small folded paper. I was wondering how to make them as well . I think they were made in Vietnam.They were between 50-300 each.
ReplyDeletetotally awesome bowl. I wonder if I have the courage to try one!!??
ReplyDeleteI have to try this. I like the idea of painting it. I may also play with trying to create a fabric,or even paper liner and see if i can fold it slightly over the edge of the bowl and then add a paper rim. I think with a project like this, it is not so much patience, but more like a meditation.
ReplyDeleteReally very useful. Thanks for sharing.
ReplyDelete