
Happy Earth day!
I promised to show you this cutting mat project long ago but it got pushed down my priority list. I decided that today was the day—very appropriate since I'm upcycling something I'm sure many of you have too. By the way, to avoid confusion, I'm not talking about a self-healing cutting mat. I'm talking about the sticky mats used for electronic cutting machines.
I don't know about you but I beat my cutting mats to death (I use the Cricut
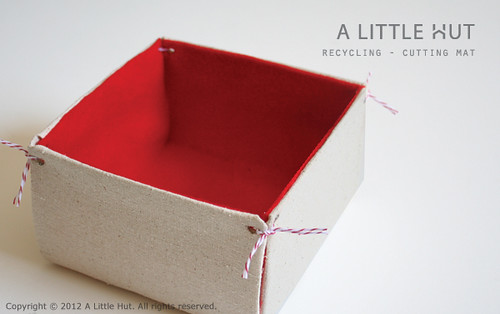
This is a simple project, very useful and there are many ways to tackle this. I've seen similar storage bins made with cereal boxes and such and everyone does it differently. I decided to use fabric, even though it isn't my first go-to medium (you all know me and sewing!) because it gives the project a 'homier' feel. It happens to look a bit "Christmassy" because I only used what I had.
Here is what I used and the steps I followed...
Materials
- one cutting mat (in this case it's a 12" square Cricut machine cutting mat)
- scissors
- ruler
- pencil
- hole punch
- fabric
- felt
- tape
- Aleene's Tacky Glue
- We R Memory Keepers Crop-A-Dile Eyelet and Snap Punch
- twine
Step 1
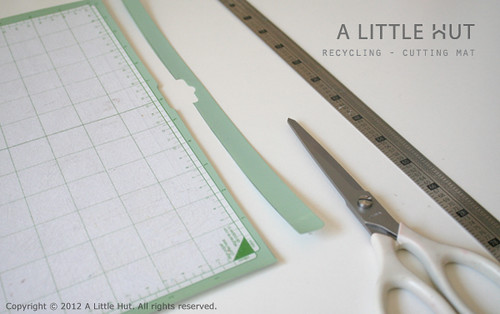
Cut off the excess from the top and bottom of the cutting mat. I measured the width of the green side borders and used that as a guide for the top and bottom. In essence we need a perfect square and keeping the grid of the mat in the center is essential for making the rest of the project go smoothly. Keeping the grid in the center helps to use it as a guide for the following step.
Step 2
Cut out a square from one of the corners that is a little over 3" (5cm) wide. I cut along the 3" mark on the cutting mat until the adjacent sides intersected. Repeat this for all the remaining 3 corners.
Note: If you don't have a We R Memory Keepers Crop-A-Dile Eyelet and Snap Punch

Step 3
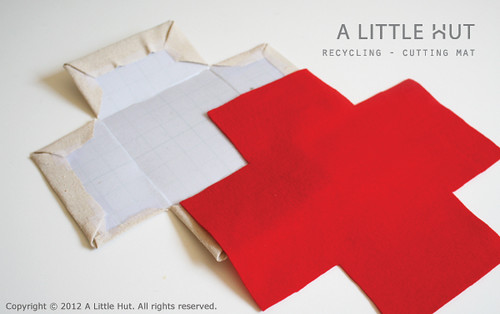
Cut out a piece of fabric that is at least 1" (2.5cm) wider than the cutting mat. Make the diagonal cutting marks shown as black dotted lines in the diagram below. As you can see in the photo (step 5) I didn't exactly follow strict measurements but I will tell you that a minimum of a 1" (2.5cm) border is much better to have.
Gently bend each corner of the cutting mat along the red dotted lines. Be careful that you don't apply to much pressure or crease to roughly. My mat cracked a bit when I tried to make my crease a bit more defined.
Step 4
Place the mat (sticky side down) onto the fabric. Fold over the outer corners of one section of the fabric first and tape them down to the mat (yellow triangles in the diagram). Fold over and tape the remaining three sides (blue areas) like you're wrapping a gift. Repeat the same steps for the remaining three sides of the mat.
Note: the taping doesn't look pretty but it won't be visible in the end. Another option is to do this whole bin as a sewn project but I went the easier (for me) route.

Step 5
Cut out a piece of felt that is about 1/8" (3mm) smaller than the wrapped cutting mat. Glue the felt to the taped side of the cutting mat.
Step 6
Using the We R Memory Keepers Crop-A-Dile Eyelet and Snap Punch
Note: I decided not to use eyelets (the only thing I have here at the moment) because I didn't want that "flowery" opposite end of an open eyelet to be visible on the inside of my bin.
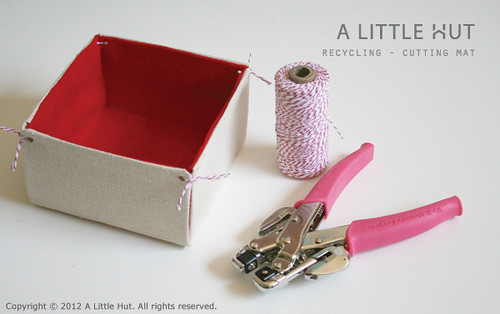
If you don't have a Crop-A-Dile you can use a simple hole punch. I would recommend punching holes in the cutting mat before wrapping it in fabric. Once you are ready for the twine, use a large embroidery needle to thread the twine through the fabric where you feel the hole that you've made at the beginning of the project.
• • •
There are many other projects that can use cutting mats in place of cardboard for support. Some other ideas include:
- mini-album covers
- small booklets or matchbook covers lined with either fabric or paper
- the inside bottoms of handbags or totes
- etc. etc.
If you have any other options or you try this project let me know in the comments. I'd love to see!
Have fun!
No comments:
Post a Comment